Spectre.Console supports the ability to use dependency injection to find types for our commands. The library has an integration mechanism so that developers can use their favorite DI engine with their command-line app. In this lesson, we will learn how to integrate the .NET Extensions dependency injection engine with Spectre.Console.
If you are unfamiliar with dependency injection, it is a design pattern to support inversion of control… allowing a component to find and create types and pass them as constructor parameters. This allows our classes to be loosely coupled and not have logic for creating these types. This type of loose coupling makes system more adaptable to change and easier to test. If you would like to read more about dependency injection (DI) please read the following article.
Reminder: you can find the source for this lesson in our Azure DevOps repo: Cli.Lesson1.5 – Repos (azure.com).
First, let’s start by creating a new Console App in Visual Studio named Cli.Lesson1.5… review project creation in Lesson 1.1, for the full details on getting setup.
Dependency Injection Components
Spectre.Console defines two interfaces that we can implement to integrate a dependency injection engine into our console application (ITypeResolver and ITypeRegistrar). We are going to use .NET 5’s dependency injection extension under the namespace: Microsoft.Extensions.DependencyInjection.
1. We start by adding the Microsoft.Extensions.DependencyInjection NuGet package to our project, using the NuGet Package manager:

2. Create an Injection folder in the project. This folder will hold our dependency injection integration code. We are separating this out to its own folder and namespace because this code would be useful for multiple projects, so it would be a good candidate to build into a separate library.
3. Create the TypeResolver class in the Injection folder:
using System;
using Microsoft.Extensions.DependencyInjection;
using Spectre.Console.Cli;

namespace Injection
{
    public sealed class TypeResolver : ITypeResolver
    {
        private readonly IServiceProvider _provider;

        public TypeResolver(IServiceProvider provider)
        {
            _provider = provider ?? throw new ArgumentNullException(nameof(provider));
        }

        public object Resolve(Type type)
        {
            return _provider.GetRequiredService(type);
        }
    }
}
This class is responsible for taking a type and getting an instance of the type from an IServiceProvider. The IServiceProvider is the container of all the known types in our dependency injection system. It’s implementation is provided by the Microsoft.Extensions.DependencyInjection component.
This class simply takes a service provider in its constructor and implements the Resolve method to get the corresponding instance of the requested type from the service provider.
4. Create the TypeRegistrar class in the Injection folder:
using System;
using Microsoft.Extensions.DependencyInjection;
using Spectre.Console.Cli;

namespace Injection
{
    public sealed class TypeRegistrar : ITypeRegistrar
    {
        private readonly IServiceCollection _builder;

        public TypeRegistrar(IServiceCollection builder)
        {
            _builder = builder;
        }

        public ITypeResolver Build()
        {
            return new TypeResolver(_builder.BuildServiceProvider());
        }

        public void Register(Type service, Type implementation)
        {
            _builder.AddSingleton(service, implementation);
        }

        public void RegisterInstance(Type service, object implementation)
        {
            _builder.AddSingleton(service, implementation);
        }
    }
}
This class is used to register types into our dependency injection system. It is a layer of abstraction over a specific injection engine, so that the Spectre.Console component can support different engines for different users.
The constructor takes an IServiceProvider to use for all type registrations. It implements two register methods that are pass-throughs to the corresponding IServiceProvider calls. And it implements a Build method that creates a TypeResolver from this same service provider.
That is all of the code that we need to integrate a dependency injection engine into this console application.
Service Definition
With the dependency injection engine integrated, we need a service to put into its container that will in turn get used in our commands. To do this, we will define an interface and implementation class to represent the repository for our fictional university system.
1. Create a Services folder in this project. This is where all of our service definitions and implementations will be placed. It is important to layout projects into logical sub-units, so that it will be easier to locate code as the project grows or when you have to come back to it months or years later.
2. Create the IUniversityRepository interface to define the expected service layout:
namespace Cli.Lessons.Services
{
    public interface IUniversityRepository
    {
        string GetName();
    }
}
For this initial stage, we define a very simple interface that just returns a name. We are doing this to ensure our integration works. We will build a richer repository in the next lesson.
3. Create the UniversityRepository class that implements the repository service:
namespace Cli.Lessons.Services
{
    internal class UniversityRepository : IUniversityRepository
    {
        public string GetName()
        {
            return "SecretName";
        }
    }
}
The implementation class just derives from the repository interface and implements the GetName method. This method just returns hard-coded text for now.
We don’t have to have separate interfaces and implementation class for our services, but it provides a good layer of insulation of the interface definition and how it is implemented. It hides class implementation details from our commands. And makes it easier to mock the interface for robust unit tests.
Command Using DI
Next we need to change our commands to use the IUniversityRepository service. When using dependency injection, that means we need to define it in the command’s constructor. That way when the command is created, it will use the DI system to get an instance of IUniversityRepository that is registered with the service provider.
For this lesson, we are only going to update the StudentAddCommand to take a repository. Let’s create that class in the Commands folder.
using Cli.Lessons.Services;
using Spectre.Console.Cli;
using Spectre.Console;
using System;
using System.ComponentModel;

namespace Cli.Lessons.Commands
{
    public class StudentAddCommand : Command<StudentAddCommand.Settings>
    {
        public class Settings : CommandSettings
        {
            [CommandArgument(0, "<ID>")]
            [Description("New student unique id.")]
            public int Id { get; set; }

            [CommandArgument(1, "<FIRST-NAME>")]
            [Description("New student first name.")]
            public string FirstName { get; set; }

            [CommandArgument(2, "<LAST-NAME>")]
            [Description("New student last name.")]
            public string LastName { get; set; }

            [CommandOption("-e|--enrollment <DATE>")]
            [Description("New student enrollment date.")]
            public DateTimeOffset? EnrollmentDate { get; set; }
        }

        private readonly IUniversityRepository _repo;

        public StudentAddCommand(IUniversityRepository repo)
        {
            _repo = repo ?? throw new ArgumentNullException(nameof(repo));
        }

        public override int Execute(CommandContext context, Settings settings)
        {
            var enrolled = settings.EnrollmentDate ?? DateTimeOffset.Now;
            AnsiConsole.MarkupLine(
                $"[bold]Add Student =>[/] id[[{settings.Id}]], " +
                $"name[[{settings.FirstName} {settings.LastName}]] " +
                $"enrolled[[{enrolled}]]");

            AnsiConsole.Console.WriteLine();
            AnsiConsole.WriteLine($"Testing: {_repo.GetName()}");
            return 0;
        }
    }
}
As we can see, this code is similar to the implementation we had in lesson 1.3. The changes to support getting the repository via DI are:
- Define a member variable to hold the repository instance (line #30).
- Add a constructor that takes an
IUniversityRepositoryparameter (line #32). Then cache that parameter for later use in the member variable. - In the execute method, call the
IUniversityRepository.GetNamemethod and display the results in the console (line #34).
This is a very simple use of the DI system and the repository, but ensures that all of the plumbing and registration is implemented correctly… without getting too deeply into business logic yet.
For the remaining command classes, we just copied the classes from lesson 1.3.
Configuring ConsoleApp for DI
Nothing we have done thus far impacts the command registration code. Whether we use DI or not, the commands are registered in the same way. The only difference under the covers is that Spectre.Console uses our ITypeRegistrar and ITypeResolver rather than their own implementation. So the commands are also registered in our DI engine. This is interesting to know, but really transparent for the typical developer.
But we do have to bootstrap the ITypeRegistrar and registers all of the services for our console app. Let’s look at this new code in the Program.cs file.
using Cli.Lessons.Commands;
using Cli.Lessons.Services;
using Injection;
using Microsoft.Extensions.DependencyInjection;
using Spectre.Console.Cli;

namespace Cli.Lessons
{
    class Program
    {
        public static int Main(string[] args)
        {
            var app = new CommandApp(RegisterServices());
            app.Configure(config => ConfigureCommands(config));

            return app.Run(args);
        }

        private static ITypeRegistrar RegisterServices()
        {
            // Create a type registrar and register any dependencies.
            // A type registrar is an adapter for a DI framework.
            var services = new ServiceCollection();

            // register services here...
            services.AddSingleton<IUniversityRepository, UniversityRepository>();

            return new TypeRegistrar(services);
        }

        private static IConfigurator ConfigureCommands(IConfigurator config)
        {
            config.CaseSensitivity(CaseSensitivity.None);
            config.SetApplicationName("lesson");
            config.ValidateExamples();

            config.AddBranch("student", student =>
            {
                student.SetDescription("View, list, add or remove students.");

                student.AddCommand<StudentAddCommand>("new")
                    .WithAlias("add")
                    .WithDescription("Add new student information.")
                    .WithExample(new[] { "student", "new", "1001", "Bill", "Shakespeare", "--enrollment", "5/14/1549" });

                student.AddCommand<StudentViewCommand>("view")
                    .WithDescription("View student information by id.")
                    .WithExample(new[] { "student", "view", "1001" });

                student.AddCommand<StudentListCommand>("list")
                    .WithDescription("View list of students.")
                    .WithExample(new[] { "student", "list" });

                student.AddCommand<StudentDeleteCommand>("delete")
                    .WithAlias("del")
                    .WithDescription("Remove student from list.")
                    .WithExample(new[] { "student", "delete", "1001" });
            });

            return config;
        }
    }
}
We took this opportunity to refactor the Program code from previous lessons to make it easier to follow and define the intention of several steps.
- The
RegisterServicesmethod (lines #19-29) provides a place to register all app-specific services and returns theTypeRegistrarfor the service provider. We callAddSingletonto add theIUniversityRepositoryinterface and its implementation class. By stating it is a singleton, there is only one instance of this type ever created. If it is requested multiple times, the single instance is returned. - The
ConfigureCommandsmethod (lines #31-61) is the configuration code extracted from the previousMainmethod. The method takes anIConfiguratorthat represents the root of the command structure. By having this code separated out, we can ensure the intent of the code here and not clutter theMainmethod. All of the command configuration code here is exactly the same as in previous lessons. - The
Mainmethod (lines #11-17) was streamlined to orchestrate three distinct steps:- Create an instance of the
Spectre.Console.Cli.CommandAppclass. In its constructor, we pass in theITypeRegistrarthat was created in theRegisterServicescall. - Then we call the
ConfigureCommandsto get all of our commands configured. - Finally, we call
CommandApp.Runto run our app with any command-line arguments.
- Create an instance of the
With these changes in place, we can now compile our command-line app and use the Microsoft.Extensions.DependencyInjection engine.
Build and Run Commands
Let’s build the project and run some commands and see what they display.
1. Just the root command (to show the help text and see the configuration is working as expected) – lesson student:

2. Let’s add a student – lesson student new 1001 Darth Pedro:
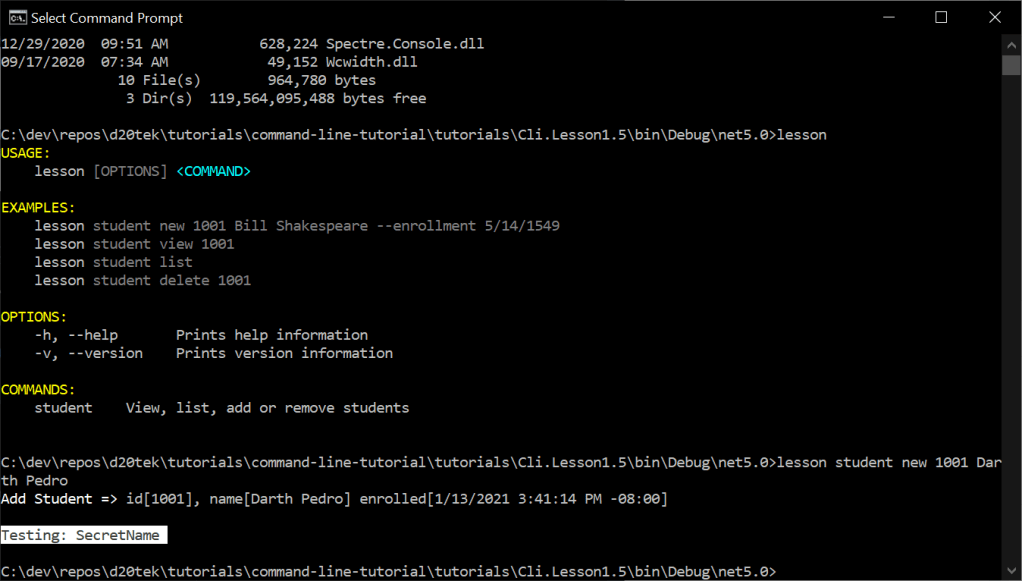
As we can see, the StudentAddCommand shows the previous student text and also shows the text returned by the IUniversityRepository.GetName method call (Testing: SecretName), so this proves that we have our DI integration code working as expected.
In conclusion, dependency injection is a design pattern that allows us to build more loosely coupled applications. There are many DI engines out in the world. Spectre.Console provides an integration layer for developers to plug in their favorite DI engine. The integration is straightforward with only a small amount of code required. With this DI integration in place, the next lesson will focus on building more robust service and commands with business logic.

One thought on “Lesson 1.5: Setting up Dependency Injection Components”