In lesson 1.5, we discussed what dependency injection was and how to build two classes to integrate our DI engine into the Spectre.Console.Cli app. This lesson will build on that and show how we can use dependency injection in a more robust example.
We will build a fully-functional IUniversityRepository, which implements all of the CRUD (create, read, update, delete) operations for a Student entity. This repository class saves all of the changes to a local file, so the student data will persist between instances of our command-line app. Then we will update our student commands to use the repository to perform actions based on the user’s command-line arguments.
We are using local file persistence to minimize the dependencies and understanding required for this lesson. But we could have just as easily built a repository that integrated with a web service that persisted these entities. And we may do that in a future lesson too…
This example is becoming a more like a command-line app that you might need to write.
Reminder: you can find the source for this lesson in our Azure DevOps repo: Cli.Lesson1.6 – Repos (azure.com).
First, let’s start by creating a new Console App in Visual Studio named Cli.Lesson1.6… review project creation in Lesson 1.1, for the full details on getting setup. Then, let’s copy the Integration folder from Lesson 1.5. This contains the DI integration code that we will reuse for this lesson.
Implement IUniversityRepository Service
We started with a very simple service to show how dependency injection worked in Spectre.Console.Cli. In this lesson, we are going to build a full service to show this in action. Let’s define an IUniversityRepository interface with a full set of CRUD operations.
1. First, we need to create the Student data entity class in the Models folder. This class represents our data model for student and all operations are performed on this entity.
using System;

namespace Cli.Lessons.Models
{
    public class Student
    {
        public int Id { get; set; }

        public string FirstName { get; set; }

        public string LastName { get; set; }

        public DateTimeOffset EnrollmentDate { get; set; }
    }
}
2. Then, we create the IUnversityRepository interface in the Services folder.
using Cli.Lessons.Models;
using System.Collections.Generic;

namespace Cli.Lessons.Services
{
    public interface IUniversityRepository
    {
        public IEnumerable<Student> GetStudents();

        public Student GetStudentById(int id);

        public void UpsertStudent(Student student);

        public void DeleteStudent(int id);
    }
}
This interface defines the methods we require to retrieve and update students in the repository. How the data is saved in memory and persisted are abstracted from the interface users. This makes our commands more adaptable to change and more testable by mocking the interface in our unit tests.
3. Create the UniversityRepository class which implements the IUniversityRepository in the Services folder.
using Cli.Lessons.Models;
using System;
using System.Collections.Generic;
using System.IO;
using System.Linq;
using System.Text.Json;

namespace Cli.Lessons.Services
{
    public class UniversityRepository : IUniversityRepository
    {
        private static string _dataFile => Path.Combine(Directory.GetCurrentDirectory(), "data.json");
        private readonly IList<Student> _students = new List<Student>();

        public UniversityRepository()
        {
            if (File.Exists(_dataFile))
            {
                var json = File.ReadAllText(_dataFile);
                _students = JsonSerializer.Deserialize<IList<Student>>(json);
            }
        }

        public void UpsertStudent(Student student)
        {
            if (_students.Any<Student>(p => p.Id == student.Id))
            {
                DeleteStudent(student.Id);
            }

            _students.Add(student);
            SaveRepository();
        }

        public void DeleteStudent(int id)
        {
            if (!_students.Any<Student>(p => p.Id == id))
            {
                throw new ArgumentException("Student does not exist in the repository.", nameof(id));
            }

            var remove = GetStudentById(id);
            _students.Remove(remove);
            SaveRepository();
        }

        public Student GetStudentById(int id) =>
            _students.FirstOrDefault(p => p.Id == id);

        public IEnumerable<Student> GetStudents() => _students.OrderBy(p => p.Id);

        private void SaveRepository()
        {
            var data = JsonSerializer.Serialize(_students);
            File.WriteAllText(_dataFile, data);
        }
    }
}
This class loads and saves student data from a data file persisted in local storage. That is sufficient for our lessons, but in a real-world application this repository could be persisting data in a mysql database or web service. Looking at the implementation in more detail:
- Line #10 shows that the
UniversityRepositoryinherits fromIUniversityRepository, which means it must implement all of the methods defined in the interface. - Line #12 figures out the full path for the local storage of the data file.
- Line #13 defines the in-memory storage of students as a list.
- The default constructor (lines #15-22) tries to load the data file and convert it from JSON to corresponding
Studentobjects. The data is persisted as text in JSON format (which is a very common format for persistence and service data transfer. If the file doesn’t exist, we just start with an empty student list. - The
UpsertStudentmethod (lines #24-33) takes aStudentobject as a parameter. If the student already exists in the list, then we update with the new student information. If it does not exist in the repository, then we add it. The in-memory data is saved to file at the end. - The
DeleteStudentmethod (lines # 35-45) uses an id to remove a student from the repository. If a student is not found with the given id, then the method throws an exception. Otherwise, the id is used to find and remove the corresponding item. The change is also persisted to data file. - The
GetStudendByIdmethod (lines #47-48) also used an id to retrieve the student from the repository. If the id exist, the corresponding student is returned. If the id doesn’t exist in the repository, then a null object is returned. - The
GetStudentsmethod (line #50) retrieve a list of all students in the repository. The students are ordered by their id. If no students exist in the repository, then an empty list is returned. - The
SaveRepositorymethod (lines #52-56) is a helper method that saves the in-memory student data to the local data file. First, it serializes the list to JSON (using the System.Text.Json implementation in .NET Core and .NET 5). Then, it writes the JSON text for the local file.
The UniversityRepository class contains all of the code needed to load and save data to a local file. And it provides the public operations defined by IUniversityRepository that commands can use without requiring any knowledge of the internals of the repository implementation class. One day we could decide to change the UniversityRepository implementation to load/save data from a MySQL database or a web service hosted in Azure. And the commands would not need to change to interact with IUniversityRepository.
Update the Student Commands
With our repository in place, lets update all of the commands to make use of it. The commands will use their matching repository method to persist the data specified as command-line arguments.
1. Create the StudentDeleteCommand class in the Commands folder.
using Cli.Lessons.Services;
using Spectre.Console.Cli;
using Spectre.Console;
using System;
using System.ComponentModel;

namespace Cli.Lessons.Commands
{
    public class StudentDeleteCommand : Command<StudentDeleteCommand.Settings>
    {
        public class Settings : CommandSettings
        {
            [CommandArgument(0, "<ID>")]
            [Description("Id used to remove student.")]
            public int Id { get; set; }
        }

        private readonly IUniversityRepository _repo;

        public StudentDeleteCommand(IUniversityRepository repo)
        {
            _repo = repo ?? throw new ArgumentNullException(nameof(repo));
        }

        public override int Execute(CommandContext context, Settings settings)
        {
            try
            {
                AnsiConsole.MarkupLine($"[bold]Delete Student =>[/] id[[{settings.Id}]]");
                _repo.DeleteStudent(settings.Id);

                AnsiConsole.MarkupLine("[darkgreen]Delete operation succeeded![/]");
                return 0;
            }
            catch (Exception ex)
            {
                AnsiConsole.WriteException(ex);
                return -1;
            }
        }
    }
}
- Notice that we defined a local variable for the
IUniversityRepositoryand a constructor that takes that repository as a parameter. We described in lesson 1.5 why that is necessary for constructor dependency injection. - Then, we use that local variable in the
Executemethod:- We write out a message telling the user what operation is being performed.
- We call the
IUniversityRepository.DeleteStudentmethod with the Id passed as a required command argument. - We display a success message when the operation completes as expected.
- We wrap all of the operations in a try/catch block. If an exception is thrown (like the id not existing in the repository), then we show the error to the user. In a real-world application, we might want to show a user-friendly message rather than the exception message.
- We follow the pattern of this method in all of our remaining commands.
2. Create the StudentListCommand in the Commands folder.
using Cli.Lessons.Services;
using Spectre.Console;
using Spectre.Console.Cli;
using System;
using System.Linq;

namespace Cli.Lessons.Commands
{
    public class StudentListCommand : Command
    {
        private readonly IUniversityRepository _repo;

        public StudentListCommand(IUniversityRepository repo)
        {
            _repo = repo ?? throw new ArgumentNullException(nameof(repo));
        }

        public override int Execute(CommandContext context)
        {
            try
            {
                AnsiConsole.MarkupLine($"[bold]List All Students[/]");

                var students = _repo.GetStudents();
                foreach (var s in students)
                {
                    AnsiConsole.MarkupLine($"{s.Id}   {s.FirstName}   {s.LastName}   {s.EnrollmentDate.Date}");
                }

                AnsiConsole.WriteLine();
                AnsiConsole.MarkupLine($"[bold]# Students:[/] {students.Count()}");
                return 0;
            }
            catch (Exception ex)
            {
                AnsiConsole.WriteException(ex);
                return -1;
            }
        }
    }
}
This command uses the IUniversityRepository.GetStudents method to retrieve all of the students in the system. Then, we loop through the results and show a table of student information. The rest of the command follows our typical layout.
3. Create the StudentUpsertCommand in the Commands folder.
using Cli.Lessons.Models;
using Cli.Lessons.Services;
using Spectre.Console.Cli;
using Spectre.Console;
using System;
using System.ComponentModel;

namespace Cli.Lessons.Commands
{
    public class StudentUpsertCommand : Command<StudentUpsertCommand.Settings>
    {
        public class Settings : CommandSettings
        {
            [CommandArgument(0, "<ID>")]
            [Description("New student unique id.")]
            public int Id { get; set; }

            [CommandArgument(1, "<FIRST-NAME>")]
            [Description("New student first name.")]
            public string FirstName { get; set; }

            [CommandArgument(2, "<LAST-NAME>")]
            [Description("New student last name.")]
            public string LastName { get; set; }

            [CommandOption("-e|--enrollment <DATE>")]
            [Description("New student enrollment date.")]
            public DateTimeOffset? EnrollmentDate { get; set; }
        }

        private readonly IUniversityRepository _repo;

        public StudentUpsertCommand(IUniversityRepository repo)
        {
            _repo = repo ?? throw new ArgumentNullException(nameof(repo));
        }

        public override int Execute(CommandContext context, Settings settings)
        {
            try
            {
                var enrolled = settings.EnrollmentDate ?? DateTimeOffset.Now;
                AnsiConsole.MarkupLine(
                    $"[bold]Update/Insert Student =>[/] id[[{settings.Id}]], " +
                    $"name[[{settings.LastName}, {settings.FirstName}]] " +
                    $"enrolled[[{enrolled}]]");

                var student = new Student
                {
                    Id = settings.Id,
                    FirstName = settings.FirstName,
                    LastName = settings.LastName,
                    EnrollmentDate = enrolled
                };
                _repo.UpsertStudent(student);

                AnsiConsole.MarkupLine("[darkgreen]Create/edit operation succeeded![/]");
                return 0;
            }
            catch (Exception ex)
            {
                AnsiConsole.WriteException(ex);
                return -1;
            }
        }
    }
}
This command is a bit more complex. It takes all of the student data as command-line arguments and creates an instance of Student with the data provided in the settings parameter. Then it uses the IUniversityRepository.UpsertStudent method to either add or modify the student. This command replaces the StudentAddCommand from the previous lessons and is more flexible by providing both add and update functionality.
4. Create the StudentViewCommand in the Commands folder.
using Cli.Lessons.Services;
using Spectre.Console.Cli;
using Spectre.Console;
using System;
using System.ComponentModel;

namespace Cli.Lessons.Commands
{
    public class StudentViewCommand : Command<StudentViewCommand.Settings>
    {
        public class Settings : CommandSettings
        {
            [CommandArgument(0, "<ID>")]
            [Description("Id used to find student.")]
            public int Id { get; set; }
        }

        private readonly IUniversityRepository _repo;

        public StudentViewCommand(IUniversityRepository repo)
        {
            _repo = repo ?? throw new ArgumentNullException(nameof(repo));
        }

        public override int Execute(CommandContext context, Settings settings)
        {
            try
            {
                AnsiConsole.MarkupLine($"[bold]View Student =>[/] id[[{settings.Id}]]");
                var _student = _repo.GetStudentById(settings.Id);
                if (_student != null)
                {
                    AnsiConsole.WriteLine("Student Information:");
                    AnsiConsole.MarkupLine($"[bold]Id:[/] {_student.Id}");
                    AnsiConsole.MarkupLine($"[bold]First Name:[/] {_student.FirstName}");
                    AnsiConsole.MarkupLine($"[bold]Last Name:[/] {_student.LastName}");
                    AnsiConsole.MarkupLine($"[bold]Enrollement Date:[/] {_student.EnrollmentDate}");
                }
                else
                {
                    AnsiConsole.MarkupLine($"[yellow]Student not found[/] with id = {settings.Id}.");
                }

                return 0;
            }
            catch (Exception ex)
            {
                AnsiConsole.WriteException(ex);
                return -1;
            }
        }
    }
}
This command uses the IUniversityRepository.GetStudentById method to retrieve data about a particular student. Then, it displays that student information in the console. If the student isn’t found in the repository, then we display a ‘not found’ message to the user.
Those are all of the required command changes. We’re ready to register our service and configure our commands again.
Review the Main Method Code
Similar to our Program class in Lesson 1.5, we need to have a main program that registered the services for our app, instantiates the Spectre.Console.Cli.ConsoleApp, configures our commands, and then runs the app.
Let’s update the Program.cs file with the following code:
using Cli.Lessons.Commands;
using Cli.Lessons.Services;
using Injection;
using Microsoft.Extensions.DependencyInjection;
using Spectre.Console.Cli;

namespace Cli.Lessons
{
    public class Program
    {
        public static int Main(string[] args)
        {
            var app = new CommandApp(RegisterServices());
            app.Configure(config => ConfigureCommands(config));

            return app.Run(args);
        }

        private static ITypeRegistrar RegisterServices()
        {
            // Create a type registrar and register any dependencies.
            // A type registrar is an adapter for a DI framework.
            var services = new ServiceCollection();

            // register services here...
            services.AddSingleton<IUniversityRepository, UniversityRepository>();

            return new TypeRegistrar(services);
        }

        private static IConfigurator ConfigureCommands(IConfigurator config)
        {
            config.CaseSensitivity(CaseSensitivity.None);
            config.SetApplicationName("lesson");
            config.ValidateExamples();

            config.AddBranch("student", student =>
            {
                student.SetDescription("View, list, add or remove students.");

                student.AddCommand<StudentUpsertCommand>("new")
                    .WithAlias("add")
                    .WithAlias("edit")
                    .WithDescription("Add new student information.")
                    .WithExample(new[] { "student", "new", "1001", "Bill", "Shakespeare", "--enrollment", "5/14/1549" });

                student.AddCommand<StudentViewCommand>("view")
                    .WithDescription("View student information by id.")
                    .WithExample(new[] { "student", "view", "1001" });

                student.AddCommand<StudentListCommand>("list")
                    .WithDescription("View list of students.")
                    .WithExample(new[] { "student", "list" });

                student.AddCommand<StudentDeleteCommand>("delete")
                    .WithAlias("del")
                    .WithDescription("Remove student from list.")
                    .WithExample(new[] { "student", "delete", "1001" });
            });

            return config;
        }
    }
}
The first thing we’ll notice is that this code is mostly like the code in Lesson 1.5: the Main and RegisterServices methods are exactly the same. We are preparing our DI container with the service in this app.
There are minor configuration changes for the new command (lines #41-45). We map the new and add argument text to the StudentUpsertCommand to make it work like an add operation. Then, we also alias edit argument text to also call the StudentUpsertCommand to give the user the ability to edit an existing student. The rest of the command configuration in this method is the same as before.
Build and Run Commands
With these code changes in place, we are ready to build again. We now have a command line app that lets users view and edit students. And these changes are persisted in a local data file. Our command-line app is getting more and more useful.
Let’s run some operations and see if we get the results that we expect. Note: since students are persisted between sessions, your results may look different if you keep saving changes in your data file. You can always delete the data.json file in the command-line app’s working folder to reset it.
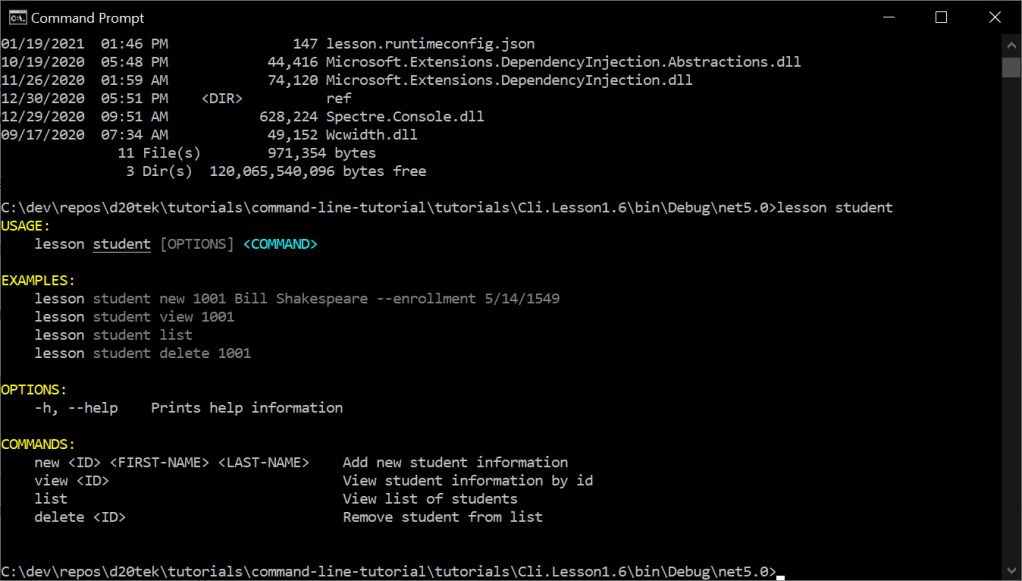
1. Just the root command – lesson student (shows the help text):
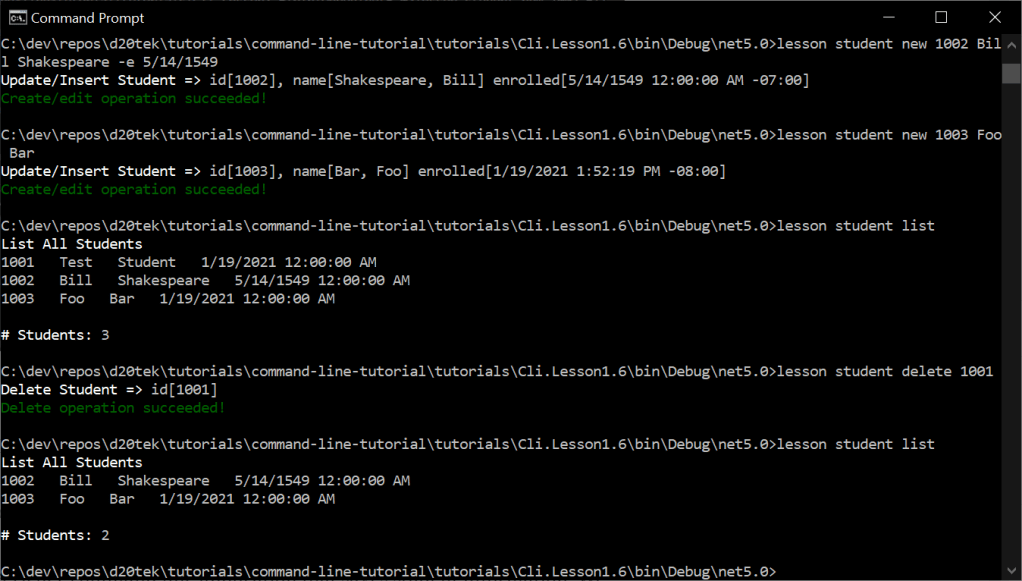
2. Let’s add a student – lesson student new 1001 Test Student:
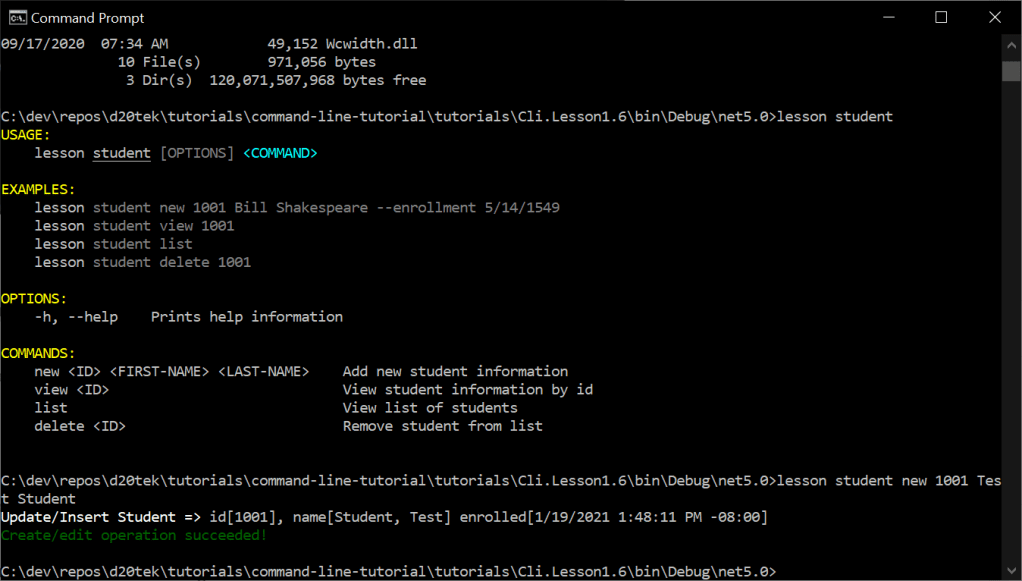
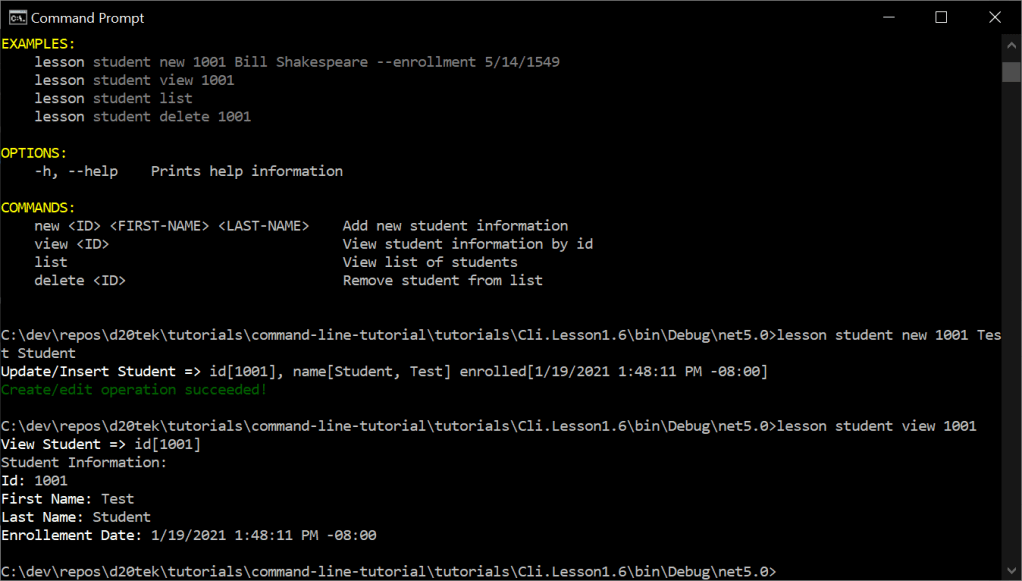
3. Let’s view the new student – lesson student view 1001:
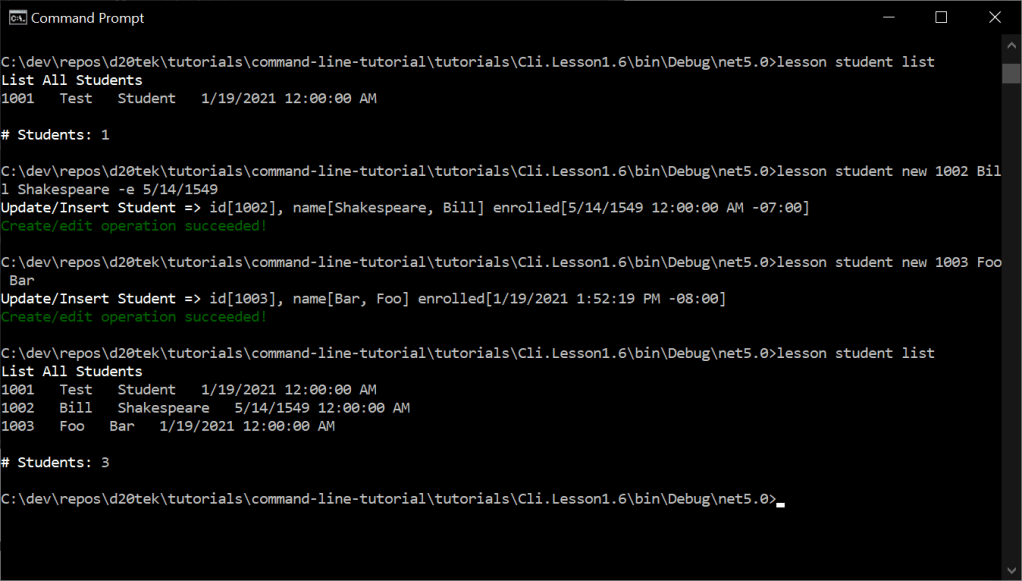
4. We’re going to add a few more students and then get the list of students – lesson student list:
5. Let’s delete a student – lesson student delete 1001:
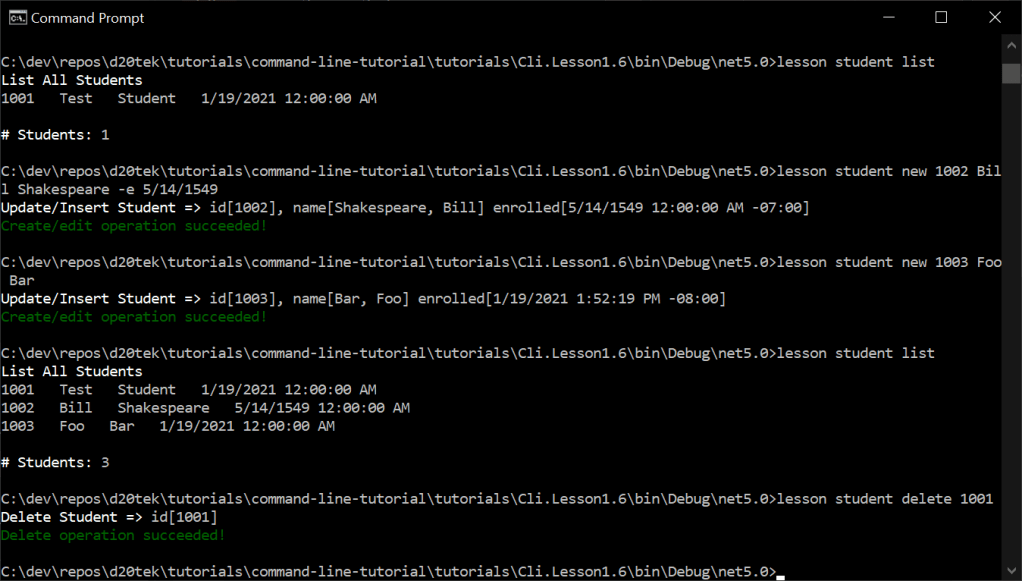
6. Let’s see another list with the 1001 student taken out – lesson student list:
In conclusion, we have built a richer command line application that saves student information. We made fuller use of the dependency injection engine to provide a real service to our commands. These commands now have business logic for integrating with the repository. And, we have made it easier to test our commands in isolation. In the next lesson, we will learn how to test those commands.

One thought on “Lesson 1.6: Using Dependency Injection”