With a working Azure Functions project in place, we are ready to start moving code into our web service. We have various sources of game data: items, monsters, locations, quests, recipes, and traders. Each of these data sources would make a great web service. So let’s start by creating a simple web service that loads ItemTemplates from an embedded resource and returns the whole list. This is very similar to the code we wrote to load game data from JSON files.
We will discuss other ways to design the service to return subsets of data in the next few lessons, because when we have a large data source, we wouldn’t want to overload the web service by retrieving all of the data for every request. But for our dataset, this is a fine initial implementation.
Load Data into Function App
The beauty of working with .NET Core on the client and service sides is that we can share the design and code between the two. What we learned about loading JSON resource files in the Blazor game engine directly translates in how we would do it in our Azure Function App.
We are going to build our the project structure with multiple folders to hold our classes. As we grow our service code, this structure will help us organize and find our code more easily. So our project structure will look like:

1. Let’s start by adding a JSON embedded resource file (items.json) to the SimpleRPG.Game.Services project and the new Data folder. This file has the exact same content as in our Blazor game engine.
[
  {
    "Id": 1001, "Category": 1, "Name": "Pointy stick", "Price": 1, "Damage": "1d2"
  },
  {
    "Id": 1002, "Category": 1, "Name": "Rusty sword", "Price": 5, "Damage": "1d3"
  },
  {
    "Id": 1501, "Category": 1, "Name": "Snake fang", "Price": 0, "Damage": "1d2"
  },
  {
    "Id": 1502, "Category": 1, "Name": "Rat claw", "Price": 0, "Damage": "1d2"
  },
  {
    "Id": 1503, "Category": 1, "Name": "Spider fang", "Price": 0, "Damage": "1d4"
  },
  {
    "Id": 2001, "Category": 2, "Name": "Granola bar", "Price": 5, "Heals": 2
  },
  {
    "Id": 3001, "Category": 0, "Name": "Oats", "Price": 1
  },
  {
    "Id": 3002, "Category": 0, "Name": "Honey", "Price": 2
  },
  {
    "Id": 3003, "Category": 0, "Name": "Raisins", "Price": 2
  },
  {
    "Id": 9001, "Category": 0, "Name": "Snake fang", "Price": 1
  },
  {
    "Id": 9002, "Category": 0, "Name": "Snakeskin", "Price": 2
  },
  {
    "Id": 9003, "Category": 0, "Name": "Rat tail", "Price": 1
  },
  {
    "Id": 9004, "Category": 0, "Name": "Rat fur", "Price": 2
  },
  {
    "Id": 9005, "Category": 0, "Name": "Spider fang", "Price": 1
  },
  {
    "Id": 9006, "Category": 0, "Name": "Spider silk", "Price": 2
  }
2. Select the items.json file in the Solution Explorer, switch to its file properties, and set its Build Action to ‘Embedded resource”.
3. Duplicate the ItemTemplate class (from the game engine) into the SimpleRPG.Game.Services projects and into the new DTO folder. We are just copying the data transfer object into the web service project for now. In the future, we will refactor the DTOs into a shared .NET Core library.
namespace SimpleRPG.Game.Services.DTO
{
    public class ItemTemplate
    {
        public int Id { get; set; }

        public int Category { get; set; }

        public string Name { get; set; } = string.Empty;

        public int Price { get; set; }

        public string Damage { get; set; } = string.Empty;

        public int Heals { get; set; }
    }
}
4. Move JsonSerializationHelper class (from the game engine) to the SimpleRPG.Game.Services project and new Repositories folder. In future lessons this class will be deleted from the game engine, when it no longer loads local data files. Note: we will explain the name of the Repositories folder in the next lesson, but it will contain classes that follow the Repository pattern.
using System;
using System.Collections.Generic;
using System.IO;
using System.Reflection;
using System.Text;
using System.Text.Json;

namespace D20Tek.Common.Helpers
{
    public static class JsonSerializationHelper
    {
        /// <summary>
        /// Deserializes the specified type and returns a list of items.
        /// Reads the json file from the assembly's resource manifest.
        /// </summary>
        /// <typeparam name="T">Type of entity to deserialize.</typeparam>
        /// <param name="resourceNamespace">Full namespace path to the resource file.</param>
        /// <returns>List of entities deserialized.</returns>
        public static IList<T> DeserializeResourceStream<T>(string resourceNamespace)
        {
            try
            {
                var assembly = typeof(T).GetTypeInfo().Assembly;
                var resourceStream = assembly.GetManifestResourceStream(resourceNamespace);
                StreamReader reader;
                using (reader = new StreamReader(resourceStream, Encoding.UTF8))
                {
                    var json = reader.ReadToEnd();
                    var elements = JsonSerializer.Deserialize<IList<T>>(json);
                    return elements;
                }
            }
            catch (JsonException)
            {
                throw;
            }
            catch (Exception ex)
            {
                throw new InvalidOperationException(
                    $"Error trying to load embedded resource for: {resourceNamespace}.", ex);
            }
        }
    }
}
If you’ve forgotten the code and purpose of this class, please review lesson 4.11.
At this point, we can build and get the items.json file embedded as an assembly resource. And using the JsonSerializationHelper class, we can read the ItemTemplate list from that file. This code is all very familiar because it is exactly how we loaded data files in our game engine library.
Expose Data via Service Endpoint
Now, let’s create a new Azure Function for ItemTemplateService. This class will start with a simple Get method to retrieve a list of all item templates in the game. We will do that by creating a new ItemTemplateService class in the SimpleRPG.Game.Services project and in the new Services folder
using D20Tek.Common.Helpers;
using Microsoft.AspNetCore.Http;
using Microsoft.AspNetCore.Mvc;
using Microsoft.Azure.WebJobs;
using Microsoft.Azure.WebJobs.Extensions.Http;
using Microsoft.Extensions.Logging;
using SimpleRPG.Game.Services.DTO;
using System.Threading.Tasks;

namespace SimpleRPG.Game.Services
{
    public static class ItemTemplateService
    {
        private const string baseRoute = "item";
        private const string _resourceNamespace = "SimpleRPG.Game.Services.Data.items.json";

        [FunctionName("GetItemTemplates")]
        public static async Task<IActionResult> GetItemTemplates(
            [HttpTrigger(AuthorizationLevel.Anonymous, "get", Route = baseRoute)] HttpRequest req,
            ILogger log)
        {
            log.LogInformation("Get ItemTemplate list.");

            var items = JsonSerializationHelper.DeserializeResourceStream<ItemTemplate>(_resourceNamespace);
            return new OkObjectResult(items);
        }
    }
}
As we can see, this code is very similar to the Function1 class that was generated with the project template. But let’s review each section again to improve our understanding of Azure Functions. Repetition is key to learning…
- We start with a public static class for the service (line #12): named
ItemTemplateService. - Define a base route for this service endpoint (line #14):
baseRoute = "item". We want our urls to be short and unique, so we’ll define item as the base routing name… otherwise Azure Functions would use the service function names in the url. - Define the fully qualified namespace to the items resource file (line #15). This the same as we did in the game engine, but has a different fully qualified name for this project (because it in includes the project name).
- Define the Azure Function method name with a descriptive name (line #18). This is a coding name, but not visible externally.
- For the
HttpRequestparameter, we define itsHttpTriggerattribute to call this method when an HTTP GET is made to this endpoint. The trigger is defined to use anonymous authorization, the GET operation, and for the base route (/api/item). - Then we use the
JsonSerializationHelper.DeserializeResourceStreammethod to load the items resource file and return it as a list ofItemTemplates. - Finally, we return an OK result with the template list. The Azure Functions infrastructure saves the result in JSON format for us, so we don’t have to serialize the list ourselves.
- If there’s an error in this method, Azure Functions will return a server error to the callers of this service.
To complete the cleanup of our project we will also delete the Function1.cs file, since we no longer need this generated source file.
At this point we have a web service implemented in Azure Functions that will retrieve a list a ItemTemplates retrieved from a resource file.
Azure Functions Unit Tests
Azure Functions also enables easy testing of services and methods because the services are implemented by simple C# classes with some attributes to define behavior. But to our test project, we can just create and access these classes and call public methods on them. Let’s show how we can test Azure Functions.
1. Create a new xUnit test project in the current solution named: SimpleRPG.Game.Services.Tests. If you need a refresher on how to create a test project, please review Lesson 1.7.
2. Add a project reference from the main source project (SimpleRPG.Game.Services).
3. Add a NuGet package for the Moq mocking framework. We also discussed mocking in lesson 1.7.
4. Create a new folder in this project named Services (to match the structure we use in our code project).
5. Create a new test class named ItemTemplateServiceTests in the Services folder with the following code:
using Microsoft.AspNetCore.Http;
using Microsoft.AspNetCore.Mvc;
using Microsoft.Extensions.Logging;
using Moq;
using SimpleRPG.Game.Services.DTO;
using System.Collections.Generic;
using System.Threading.Tasks;
using Xunit;

namespace SimpleRPG.Game.Services.Tests.Services
{
    public class ItemTemplateServiceTests
    {
        private readonly HttpRequest request = new Mock<HttpRequest>().Object;
        private readonly ILogger logger = new Mock<ILogger>().Object;

        [Fact]
        public async Task GetItemTemplates()
        {
            // arrange

            // act
            var result = await ItemTemplateService.GetItemTemplates(request, logger);

            // assert
            Assert.NotNull(result);
            Assert.IsType<OkObjectResult>(result);
            var okRes = (OkObjectResult)result;
            Assert.Equal(200, okRes.StatusCode);
            var templateList = okRes.Value as IList<ItemTemplate>;
            Assert.Equal(15, templateList.Count);
            Assert.Contains(templateList, p => p.Name == "Rusty sword");
        }
    }
}
This test sets up some mock objects for the request and logger parameters with default behavior, so that they can be used in our service call. Then we call the ItemTemplateService.GetItemTemplates method to test it. Since ItemTemplateService is a static class with a public static method, we can just call it without having to create an instance of the service. Finally, we validate that the result is an OkObjectResult (like we expected) with value data that includes the item template list. The list is accessible directly because it hasn’t been serialized yet. So we can validate the data within the list (to make sure it has an item template named “Rusty sword”).
This test validates the end-to-end that we were expecting. And as we can see, testing Azure Functions is just as easy as testing any other C# class and methods.
We also created more tests to validate that the JsonSerializationHelper works as expected, but we won’t review that here. If you want to dive deeper into those tests, review the full commit for this lesson.
If we build and run our tests at this point, we should be able to a successful test run so we can be confident that the service does what we expected.
Test ItemTemplateService Locally
Finally, we can also run the Azure Function locally so that we can see the results from it. Press F5 to build and debug the project.
This will launch a console window for the Azure Functions runtime.
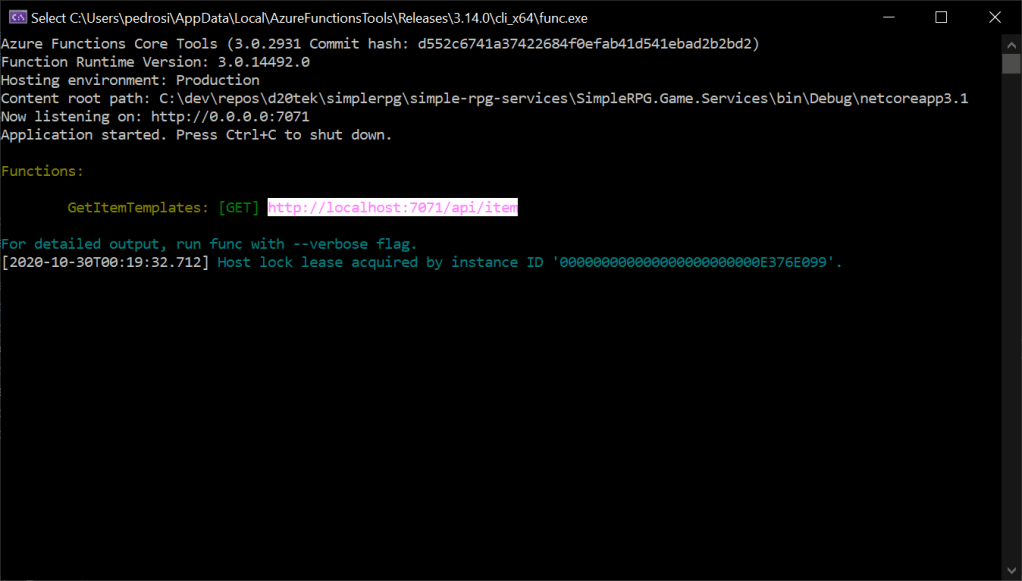
As we can see, there is a single endpoint for the GetItemTemplates operation which maps to the http://localhost:7071/api/item url. Note: the localhost port will be different on your machine, but the relative url will be the same.
Copy the url into your browser to see the results:

We can see all of the item templates that we included in our items.json file, so everything is working as we expect in this simple service.
In this lesson, we’ve created our first (albeit very simple) service endpoint. We went through defining a new Azure Functions class, how to test our code and logic, and then running our service locally. Next we can start looking at more complex service logic and how we can use Azure Functions to build a REST-ful API.

One thought on “Lesson 5.5: Create Web Service to Retrieve ItemTemplates”