With our first service complete, it’s time for us to look into creating more services. Each of our data files in the SimpleRPG game can really be thought of as its own service. Each one represents some classes and domain model like items or monsters. And while they may interact with one another (monsters can have items as loot or its attack weapon), they are distinct entities. We could build the full set of REST operations (GET, POST, PUT, DELETE) on each of them, so we will make that our service boundary.
In the last several years, you’ve probably heard a lot about microservices. Microservice architecture arranges an application as a collection of loosely coupled services. In a microservices architecture, services are fine-grained and the protocols are lightweight. Additional microservices principles include:
- Single responsibility principle – each service is responsible for only one thing.
- Built around business capabilities.
- Observability – developers follow a DevOps process and own the service from inception to running it.
- Autonomous – services are delivered with independent releases, scaling, data stores, etc. Ability to use the right tool for each service.
- Automation – CI/CD for the service releases and updates.
- Resilience – there is fault tolerance between services and eventual consistency in the data model.
This is an architectural pattern that we will follow for our services. This is not another layer in an application or service. It is just a set for principles that we follow to keep our code clean and independent. These types of patterns help us deliver maintainable services and features more quickly.
Azure Functions gives us the ability to follow the microservices pattern, though it is also possible to build large monolithic services with it as well. We need to decide the boundaries of our services and how we maintain a clear line between them. Here is how we can use Azure Functions to meet the microservices principles.
- Build REST services that follow simple HTTP protocol and operations (as we started with
ItemTemplateServicein the last lesson). - Define a new service class for each domain boundary that we wish to support (
ItemTemplateServiceandMonsterTemplateServicefor example). - Build robust logging into the Azure Function, which flows automatically into Azure Monitor.
- Divide each service into its own Azure Function App (defined as a resource in Azure). We will cover this later in our Azure deployment lessons. And we will also explore various Azure Storage options with our repositories… we could theoretically use different storage mechanisms for each of the services that we define based on their needs.
- We will build a robust continuous integration and continuous delivery pipeline for our Azure Functions in Azure DevOps… as we did for the SimpleRPG Blazor webapp.
That’s a lot of conceptual discussion about microservice architecture. We already saw some of it in action with our ItemTemplateService. Although we didn’t realize it at the time, we already built our first microservice. Now, we will look at expanding that concept into our second microservice… the MonsterTemplateService.
We will visit these principles as we continue through this chapter, especially when we dig into Azure Function resource definitions, building the service CI/CD pipelines, and review the capabilities of Azure Monitor.
Let’s build the service that returns our monster information.
Loading MonsterTemplate Data
Let start by adding the monsters.json data file and the Data Transfer Objects (DTOs) to support that file. This will be very similar to what we did in Lesson 5.5.
1. Add a JSON embedded resource file (monsters.json) to the SimpleRPG.Game.Services project and the Data folder.
[
  {
    "Id": 1,
    "Name": "Snake",
    "Dex": 15,
    "Str": 12,
    "AC": 10,
    "MaxHP": 4,
    "WeaponId": 1501,
    "RewardXP": 5,
    "Gold": 1,
    "Image": "/images/monsters/snake.png",
    "LootItems": [
      { "Id": 9001, "Perc": 25 },
      { "Id": 9002, "Perc": 75 }
    ]
  },
  {
    "Id": 2,
    "Name": "Rat",
    "Dex": 8 ,
    "Str": 10,
    "AC": 10,
    "MaxHP": 5,
    "WeaponId": 1502,
    "RewardXP": 5,
    "Gold": 1,
    "Image": "/images/monsters/rat.png",
    "LootItems": [
      { "Id": 9003, "Perc": 25 },
      { "Id": 9004, "Perc": 75 }
    ]
  },
  {
    "Id": 3,
    "Name": "Giant Spider",
    "Dex": 12,
    "Str": 15,
    "AC": 12,
    "MaxHP": 10,
    "WeaponId": 1503,
    "RewardXP": 10,
    "Gold": 3,
    "Image": "/images/monsters/giant-spider.png",
    "LootItems": [
      { "Id": 9005, "Perc": 25 },
      { "Id": 9006, "Perc": 75 }
    ]
  }
]
2. Select the monsters.json file in the Solution Explorer, switch to its file properties, and set its Build Action to “Embedded resource”.
3. Define the LootItem class in the SimpleRPG.Game.Services project and the DTO folder.
namespace SimpleRPG.Game.Services.DTO
{
    public class LootItem
    {
        public int Id { get; set; }

        public int Perc { get; set; }
    }
}
4. Define the MonsterTemplate class in the SimpleRPG.Game.Services project and the DTO folder.
using System.Collections.Generic;

namespace SimpleRPG.Game.Services.DTO
{
    public class MonsterTemplate : NamedElement<int>
    {
        public int Dex { get; set; }

        public int Str { get; set; }

        public int AC { get; set; }

        public int MaxHP { get; set; }

        public int WeaponId { get; set; }

        public int RewardXP { get; set; }

        public int Gold { get; set; }

        public string Image { get; set; } = string.Empty;

        public IEnumerable<LootItem> LootItems { get; set; } = new List<LootItem>();
    }
}
This class derives from NamedElement, so that it can be used in our repository classes. These simple data classes are just used to load and save game data and contain no logic. If you need a refresher on Data Transfer Objects pattern, please review Lesson 4.11.
With the file and classes in place, we can now load monster data from our resource file.
Refactor RepositoryFactory Class
In the last lesson, we created a type-specific, derived repository for ItemTemplateMemoryRepository to hold all of our configuration data and provide a default constructor. This simplified the way the RepositoryFactory worked without needing to provide all of the details to create the typed repository. However, this introduces a new derived class into our system that we really don’t need, so it would be a better design not to require it.
To remove the typed repository but still keep its creation clean and simple, we are going to use the Builder pattern to build the appropriate typed repository with its configuration data.
Builder Creation Pattern
The Builder pattern separates the construction of a complex object from its representation so that the same construction process can create different representations. We will define an interface for repository builders. And then have different implementations for the various repositories we will support. Each builder will maintain all of the configuration required to instantiate the repository. Finally, we will update the RepositoryFactory to use the appropriate builder class.
Let’s create the IRepository interface in the Repositories folder. This is a simple base interface for all repositories, so that we can return it from our builders. We decided to define a base interface for this rather than return an untyped object.
namespace SimpleRPG.Game.Services.Repositories
{
    public interface IRepository
    {
    }
}
Then, create the IRepositoryBuilder interface in the Repositories folder. This interface has only one method to create the appropriate repository.
namespace SimpleRPG.Game.Services.Repositories
{
    public interface IRepositoryBuilder
    {
        public IRepository CreateRepository();
    }
}
Next, we create the RepositoryBuilders.cs file in the Repositories folder. This file will hold all of our repository builders. We usually place classes in their own source files, but since we will have many small builders with very similar implementations, we’re going to place them into a single file.
using SimpleRPG.Game.Services.DTO;
using System;
using System.Collections.Generic;

namespace SimpleRPG.Game.Services.Repositories
{
    internal class ItemTemplateMemoryRepositoryBuilder : IRepositoryBuilder
    {
        private const string _resourceNamespace = "SimpleRPG.Game.Services.Data.items.json";
        private static readonly List<NameValuePair<Func<ItemTemplate, string, bool>>> _knownFilters =
            new List<NameValuePair<Func<ItemTemplate, string, bool>>>
            {
                new NameValuePair<Func<ItemTemplate, string, bool>>("category", (f, v) => f.Category == Convert.ToInt32(v)),
            };

        private static readonly List<NameValuePair<Func<ItemTemplate, object>>> _knownSorts =
            new List<NameValuePair<Func<ItemTemplate, object>>>
            {
                new NameValuePair<Func<ItemTemplate, object>>("category", p => Convert.ToInt32(p.Category)),
                new NameValuePair<Func<ItemTemplate, object>>("price", p => p.Price)
            };

        public IRepository CreateRepository()
        {
            var entities = JsonSerializationHelper.DeserializeResourceStream<ItemTemplate>(_resourceNamespace);
            var result = new InMemoryReadRepository<ItemTemplate, int>(entities, _knownFilters, _knownSorts);

            return result;
        }
    }

    internal class MonsterTemplateMemoryRepositoryBuilder : IRepositoryBuilder
    {
        private const string _resourceNamespace = "SimpleRPG.Game.Services.Data.monsters.json";

        public IRepository CreateRepository()
        {
            var entities = JsonSerializationHelper.DeserializeResourceStream<MonsterTemplate>(_resourceNamespace);
            var result = new InMemoryReadRepository<MonsterTemplate, int>(entities);

            return result;
        }
    }
}
There are two builder classes for ItemTemplate repository and MonsterTemplate repository. As we can see both builders are very similar in structure.
- The
ItemTemplateMemoryRepositoryBuildercontains the filtering and sorting data that was encoded into theItemTemplateMemoryRepositoryclass. And it contains the full namespace of the embedded resource file for items.json.- It implements the
IRepositoryBuilderinterface. - The
CreateRepositorymethod uses theJsonSerializationHelperto load the resource file into a list ofItemTemplates. - Then creates an instance of the
InMemoryReadRepositorywith the correct type and providing theItemTemplateslist as input.
- It implements the
- The
MonsterTemplateMemoryRepositoryBuildercontains no additional filters or sorting data to show that we can build repositories without specifying those elements. It does also have a full namespace to the embedded resource file for monsters.json.- It implements the IRepositoryBuilder interface.
- The
CreateRepositorymethod uses theJsonSerializationHelperto load the resource file into a list ofMonsterTemplates. - Then creates an instance of the
InMemoryReadRepositorywith the correct type and passing in theMonsterTemplateslist as input.
As we can see the builders are very simple, contain all of the configuration data required to build the appropriate repository, and have a very similar structure. With these two builders in place, we can refactor the RepositoryFactory to use them rather than the typed repository constructor.
Refactor the IReadableRepository interface
Since we defined the IRepository interface to use as return values from our builders, we need to update the IReadableRepository<T, TId> class to derive from it. Since IRepository is a simple, empty interface, this is a very simple change (line #7).
using SimpleRPG.Game.Services.DTO;
using System.Collections.Generic;
using System.Threading.Tasks;

namespace SimpleRPG.Game.Services.Repositories
{
    public interface IReadableRepository<T, TId> : IRepository
        where T : NamedElement<TId>
        where TId : struct
    {
        Task<IEnumerable<T>> GetEntities(
            int? offset,
            int? limit,
            IEnumerable<NameValuePair<string>> filters,
            IEnumerable<NameValuePair<string>> sorts);

        Task<int> GetEntityCount(IEnumerable<NameValuePair<string>> filters);

        Task<T> GetEntityById(TId id);

        Task<IEnumerable<T>> GetBulkEntitiesById(IEnumerable<TId> ids);
    }
}
Change RepositoryFactory to Use IRepositoryBuilder
The final steps in this refactoring is modifying the RepositoryFactory to remove the dependency on ItemTemplateMemoryRepository and use the IRepositoryBuilder implementations instead. We will do this by modifying the RepositoryFactory to look like the following code:
using SimpleRPG.Game.Services.DTO;
using System;
using System.Collections.Generic;

namespace SimpleRPG.Game.Services.Repositories
{
    public static class RepositoryFactory
    {
        private const string _repoResources = "resource";
        private static readonly Dictionary<Type, IRepositoryBuilder> _resourceBuilderMapping =
            new Dictionary<Type, IRepositoryBuilder>
            {
                { typeof(ItemTemplate), new ItemTemplateMemoryRepositoryBuilder() },
                { typeof(MonsterTemplate), new MonsterTemplateMemoryRepositoryBuilder() }
            };

        public static IReadableRepository<T, TId> CreateRepository<T, TId>(string repoSource)
            where T : NamedElement<TId>
            where TId : struct
        {
            switch (repoSource)
            {
                case _repoResources:
                    return CreateResourceRepository<T, TId>();
                default:
                    throw new ArgumentOutOfRangeException(nameof(repoSource));
            }
        }

        private static IReadableRepository<T, TId> CreateResourceRepository<T, TId>()
            where T : NamedElement<TId>
            where TId : struct
        {
            var builder = _resourceBuilderMapping[typeof(T)];
            return builder.CreateRepository() as IReadableRepository<T, TId>;
        }
    }
}
- First, we change the
_resourceBuilderMappingdefinition (lines #10-11) to accept anIRepositoryBuilder, rather than aFunc<object>that called the constructor. This allows us to use builders with the appropriate interface in our factory and abstract any knowledge of the repository construction process. - Then in line #13, we replaced the constructor call with an instance of the
ItemTemplateMemoryRepositoryBuilderbuilder. - We added the
MonsterTemplatemapping (line #14) with an instance of theMonsterTemplateMemoryRepositoryBuilderbuilder. - Finally, we update the
CreateResourceRepositorymethod (lines #34-35) to rename variables to match builder naming, retrieve the builder from the_resourceBuilderMapping, and call itsCreateRepositorymethod.
With these minor changes to the RepositoryFactory, we’re able to retrieve the repository we require… either for ItemTemplates or MonsterTemplates. As we grow the repository list to include other types, we will only need to create factory builders and add them to the _resourceBuilderMapping dictionary to expose them through our factory.
And, as a cleanup step, we will delete the ItemTemplateMemoryRepository class from our solution, since we don’t use that any longer.
Now our monster repository and the RepositoryFactory are available to our service implementation…
Create MonsterTemplateService
As we discussed about microservices in this lesson, we’re going to create a separate service endpoint for the MonsterTemplateService. This endpoint is separately addressable and distinct from our other service. To enable this, we will create the new MonsterTemplateService class in the SimpleRPG.Game.Services project and Services folder.
using Microsoft.AspNetCore.Http;
using Microsoft.AspNetCore.Mvc;
using Microsoft.Azure.WebJobs;
using Microsoft.Azure.WebJobs.Extensions.Http;
using Microsoft.Extensions.Logging;
using SimpleRPG.Game.Services.DTO;
using SimpleRPG.Game.Services.Repositories;
using SimpleRPG.Game.Services.Services;
using System;
using System.Collections.Generic;
using System.Threading.Tasks;

namespace SimpleRPG.Game.Services
{
    public static class MonsterTemplateService
    {
        private const string _baseRoute = "monster";
        private static readonly IReadableRepository<MonsterTemplate, int> _repo =
            RepositoryFactory.CreateRepository<MonsterTemplate, int>("resource");

        [FunctionName("GetMonsterTemplates")]
        public static async Task<IActionResult> GetMonsterTemplates(
            [HttpTrigger(AuthorizationLevel.Anonymous, "get", Route = _baseRoute)] HttpRequest req,
            ILogger log)
        {
            try
            {
                log.LogInformation("GetMonsterTemplates method called.");
                _ = req ?? throw new ArgumentNullException(nameof(req));

                int? offset = null;
                int? limit = null;
                IEnumerable<NameValuePair<string>> filters = null;
                IEnumerable<NameValuePair<string>> sorts = null;

                if (req.Query != null)
                {
                    offset = req.Query.GetValue<int>("offset");
                    limit = req.Query.GetValue<int>("limit");
                    filters = req.Query.GetValues("filters");
                    sorts = req.Query.GetValues("sorts");
                }

                var monsters = await _repo.GetEntities(offset, limit, filters, sorts).ConfigureAwait(false);

                log.LogInformation("GetMonsterTemplates method completed successfully.");
                return new OkObjectResult(monsters);
            }
            catch (Exception ex)
            {
                log.LogError(ex, "Error processing GetMonsterTemplates method.");
                throw;
            }
        }

        [FunctionName("GetMonsterTemplateCount")]
        public static async Task<IActionResult> GetMonsterTemplateCount(
            [HttpTrigger(AuthorizationLevel.Anonymous, "get", Route = _baseRoute + "-count")]
            HttpRequest req,
            ILogger log)
        {
            try
            {
                log.LogInformation("GetMonsterTemplateCount method called.");
                _ = req ?? throw new ArgumentNullException(nameof(req));

                IEnumerable<NameValuePair<string>> filters = null;
                if (req.Query != null)
                {
                    filters = req.Query.GetValues("filters");
                }

                var count = await _repo.GetEntityCount(filters).ConfigureAwait(false);

                log.LogInformation("GetMonsterTemplateCount method completed successfully.");
                return new OkObjectResult(count);
            }
            catch (Exception ex)
            {
                log.LogError(ex, "Error processing GetMonsterTemplateCount method.");
                throw;
            }
        }

        [FunctionName("GetMonsterTemplateById")]
        public static async Task<IActionResult> GetMonsterTemplateById(
            [HttpTrigger(AuthorizationLevel.Anonymous, "get", Route = _baseRoute + "/{id}")]
            HttpRequest req,
            ILogger log,
            int id)
        {
            try
            {
                log.LogInformation("GetMonsterTemplateById method called.");

                var show = await _repo.GetEntityById(id).ConfigureAwait(false);

                log.LogInformation("GetMonsterTemplateById method completed successfully.");
                return new OkObjectResult(show);
            }
            catch (EntityNotFoundException ex)
            {
                log.LogInformation(ex, $"GetMonsterTemplateById method called with missing id - {id}.");
                return new NotFoundResult();
            }
            catch (Exception ex)
            {
                log.LogError(ex, "Error processing GetMonsterTemplateById method.");
                throw;
            }
        }
    }
}
As we can see, this service class is very similar to the ItemTemplateService class the we created in the last lesson.
- It has
GetMonsterTemplates,GetMonsterTemplateCount, andGetMonsterTemplateByIdmethods. - A different route to this endpoint and its resources.
- Along with similar methods, it also defines the type of repository to use and uses the
RepositoryFactoryto get theMonsterTemplaterepository. - The methods and parameters are decorated with the attributes required for Azure Functions names and HttpTriggers.
Beyond the structure of the class and methods, the actual implementation of each method is nearly identical… except for the type information. In the next lesson, we will refactor our existing services to share most of this duplicate code.
With our service code complete, we can build and run our Azure Functions. After a clean build, we will get the following Azure Functions runtime window. Notice that there are 3 new service methods available and their new endpoint URIs.
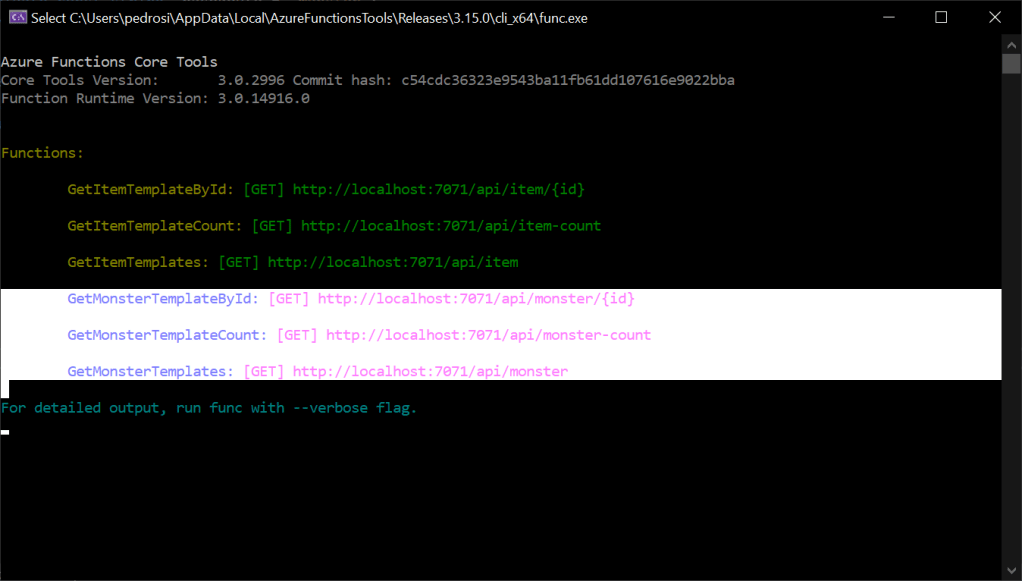
Now we can display the following URL in the browser to see all MonsterTemplates returned by our service: http://localhost:7071/api/monster (note the localhost port will be different for your instance).

And we can also get a specific monster with the following URL: http://localhost:7071/api/monster/1

This concludes our lesson about microservices and the creation of our second web service with Azure Functions. The service implementations have been straightforward in C# class with attributes. The Functions runtime takes care of the scaffolding for our services. In the next lesson, we have to refactor that pesky redundant service code as we build the LocationTemplateService.

One thought on “Lesson 5.8: Microservices Concepts With MonsterTemplateService”