Here are the quick steps to create a Blazor WebAssembly project for .NET 5 in Visual Studio. The basic template creates some extra pages and components, so we will also clean it up to produce a minimal project with a home page. This is a great starting point for all of our Blazor projects.
Initial Blazor Project
Let’s create the Blazor project targeting .NET 5.
1. In Visual Studio, press the ‘Create new project’ option (either in the start screen or in VS the main menu).
2. Search for Blazor App project, select it in the list, and press the ‘Next’ button.

3. Then, name the project to a desired designation, like ‘Blazor.HowTo’ for this example.
4. Select the working location field to our typical working folder, and press the ‘Create’ button.

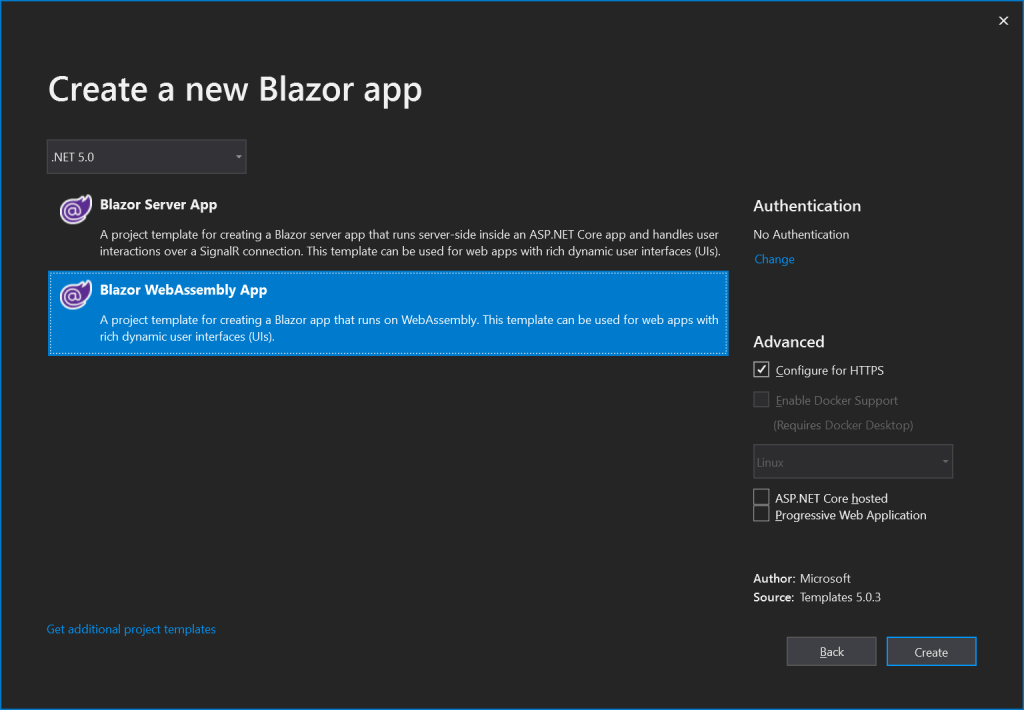
5. In the Blazor configuration dialog:
- Change target platform dropdown to ‘.NET 5.0’
- Select the ‘Blazor WebAssembly App’ item.
- Optionally, check the ‘ASP.NET Core hosted’ item when you will host your Blazor project in an ASP.NET Core hosted environment. This is one possible hosting model, but we can also host our Blazor WebAssembly as a static website.
- Optionally, check the ‘Progressive Web Application’ item if you want you app to behave like a PWA.
6. We leave the optional settings to their default, and click the ‘Create’ button.
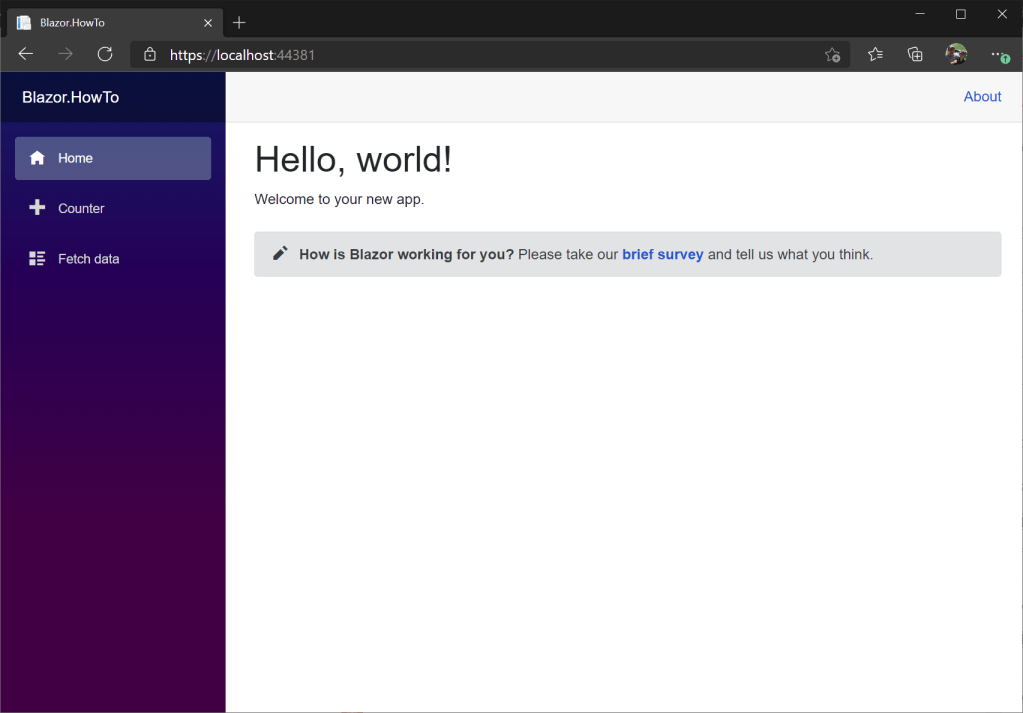
This creates a basic Blazor WebAssembly project. For those unfamiliar with Blazor projects, please review the ASP.NET Core Blazor project structure article. We can build and run this project and see the default home page with a couple of sample pages (Counter and FetchData).
Clean the Project
While the sample pages are useful when learning how to use Blazor, they are unnecessary for our actual applications. So, we’re going to clean this up.
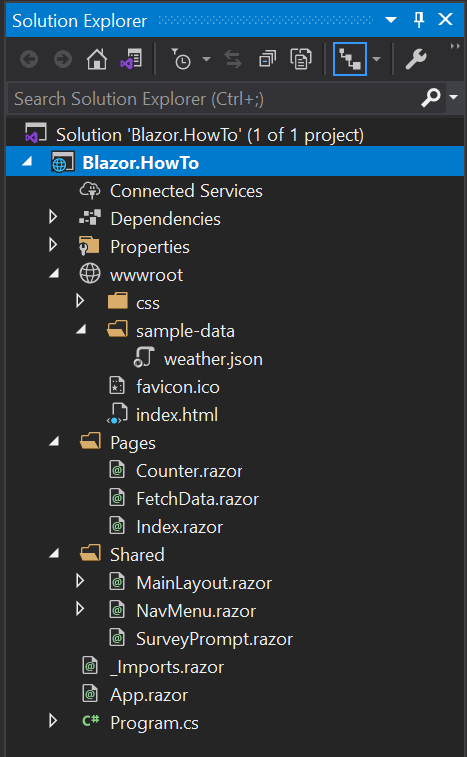
Here is the starting project structure in the Visual Studio Solution Explorer:
- Let’s delete some unnecessary files and folders.
- delete the sample-data folder – holds weather.json data for the FetchData page.
- delete the Counter.razor file.
- delete the FetchData.razor file.
- delete the SurveyPrompt.razor file.
- Update the NavMenu.razor file to change the app name (line #2) and remove the links to the Counter and FetchData pages.
<div class="top-row pl-4 navbar navbar-dark">
    <a class="navbar-brand" href="">Blazor HowTo</a>
    <button class="navbar-toggler" @onclick="ToggleNavMenu">
        <span class="navbar-toggler-icon"></span>
    </button>
</div>

<div class="@NavMenuCssClass" @onclick="ToggleNavMenu">
    <ul class="nav flex-column">
        <li class="nav-item px-3">
            <NavLink class="nav-link" href="" Match="NavLinkMatch.All">
                <span class="oi oi-home" aria-hidden="true"></span> Home
            </NavLink>
        </li>
    </ul>
</div>

@code {
    private bool collapseNavMenu = true;

    private string NavMenuCssClass => collapseNavMenu ? "collapse" : null;

    private void ToggleNavMenu()
    {
        collapseNavMenu = !collapseNavMenu;
    }
}
- Update the Index.razor file to remove the reference to the
SurveyPromptcomponent.
@page "/"

<h1>Welcome to Blazor How-To!</h1>

Welcome to your new app.
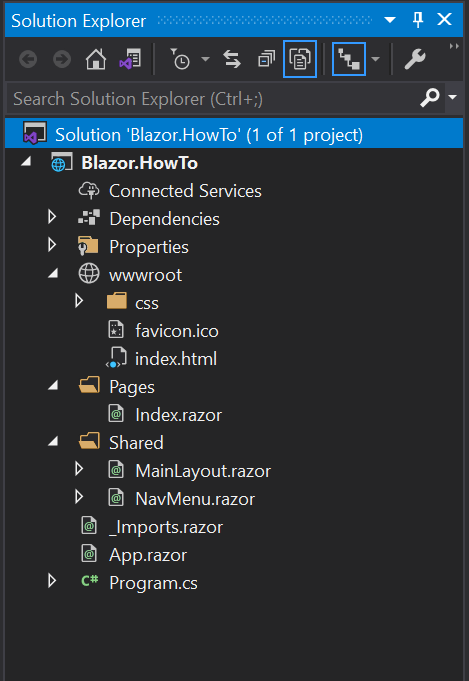
With the files removed, the project structure in the Solution Explorer should now look like this:
We can validate our changes by rebuilding the project. When we run it again, we will see that the Blazor app only has a home page and that single button in the navigation bar.

In conclusion, this article went through the steps to create a new Blazor WebAssembly project, and clean up the non-essential artifacts in the project. We now only have the parts of the project that we will need in our applications, and can start building from here.

9 thoughts on “How-To: Create Blazor WASM Project”