Azure DevOps is a tool for managing source code, work items, test plans, and CI/CD pipelines. When we are building production software, we need to manage our code and work efficiently. Azure DevOps gives us the tools to do that. And it supports industry-leading tools, like Git, Docker, and Kubernetes, so we can use the power of open source tools within DevOps. Before we even write one line of code, we’re going to set up our source control system.
Initial Steps:
First, log into Azure Devops with a Microsoft Account. If you haven’t done it before, this will create your account and a default organization based on your user name. You can start with that organization for your personal projects.
For our project, we want to create some brand identity, so I created a new organization (by clicking the New Organization link). This will walk us through some TOS and privacy screens. Then ask for a new organization name… for my project I picked d20Tek as the organization name (note: it needs to be a unique organization name).
After a couple of minutes, our organization will appear and allow us to create our first project for that org with the following options:
- Project name: SimpleRPG (name your project what you would like, but this name is used throughout the lessons).
- Visibility: Public is good for open source projects that we wish to share and gather contributors for; private is for our own projects or a private team to work with.
- Version control: select Git.
- Work item process: select Basic. Other options exist for Agile, Scrum, etc.

This will open a new project workspace with lots of options on the left hand navigation panel. We’re not going to cover all of the options at this point. It will take days to get a full understanding of all the features represented there. But let’s start the with Repos tab.
Repos
This contains the list of all Git code repositories in our project server. Currently it’s empty. There is a default empty SimpleRPG repo (short for repository). But this is where we will come when we want to create a new repository or manage the repositories in our project.
Based on our micro-architecture, we are going to create several git repositories. Typically each packaged library or service will be contained in its own repo. This prevents unintended internal dependencies from creeping in. We will package up our libraries into NuGet packages and then consume them in other components, just as if they were an external package from the open source community.

So let’s create our first new Git repo:
- Select the SimpleRPG repo dropdown in the top header of the page.
- Then pick the New Repository menu item.
- Enter a new repository name: simple-rpg-game, leave Add README enabled (all projects should have a readme describing its purpose), and Add a .gitignore for Visual Studio (since we know that’s the tool we’re working with).
- And, click the Create button.
This will result in a new repository being created with two files (.gitignore and README.md). Pretty simple.

Branches
Repos get created with a default main branch. Think of this as the latest shipping version of our code. Only the code we intend to go out should get checked into this branch. Any work in progress or experimentation should happen in a feature or private branch.
Git has a rich set of branching features. We’re not going to cover them all here, but if you’re interested, you can read up more about them. Just understand that things should not be directly checked into the main branch, so all of the work we do will be in feature branches which are then merged into the main branch at discrete points in time – i.e. when the feature or bug fix is complete.

So, we need to lock down the repo that we just created by setting some branching policies:
- Click Branches in the left navigation panel.
- There will be a single main branch in the simple-rpg-game repo.
- Hover over that line and click on the … button at the far right. (yes, it’s very well hidden).
- Click the Branch Policies menu item.
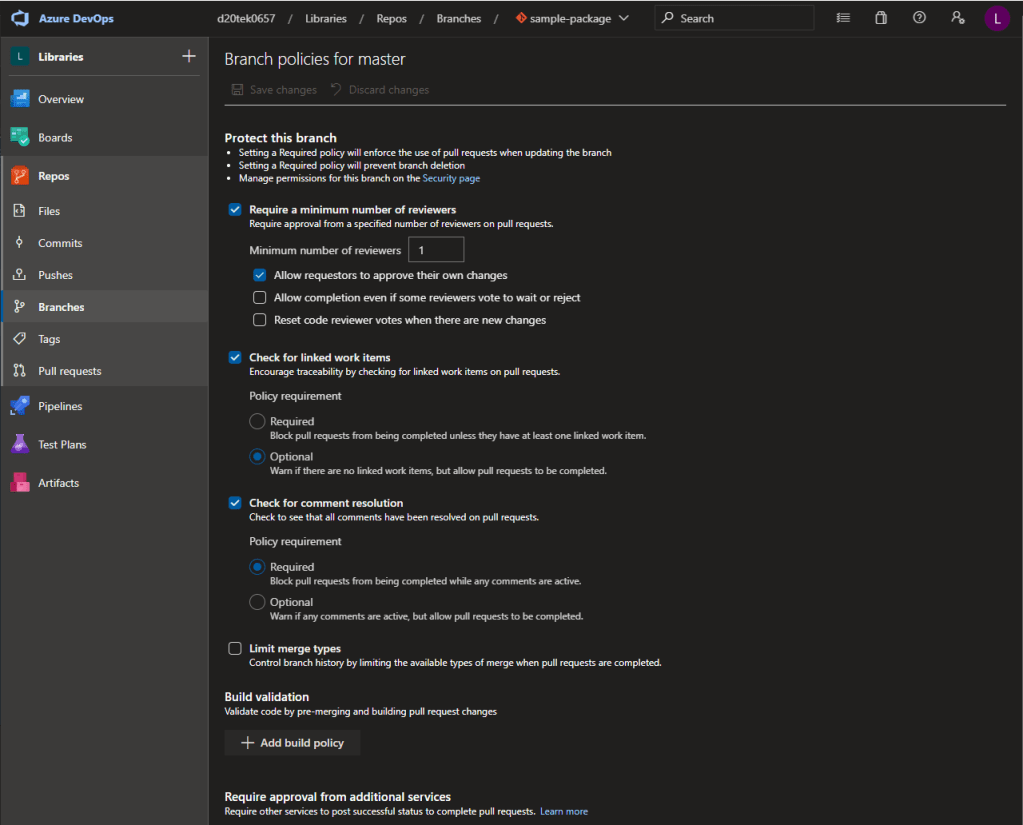
- Turn on: Require a minimum number of reviewers with minimum of 1.
- Also since this is currently an organization of just one person, check the item to allow requestors to approve their own changes (this would obviously be different in larger organizations or projects).
- Turn on: Check for linked work items, but make it optional.
- This is a good way to link work items to checkins for end to end tracking. This gives us the ability to track work and checkins without requiring it for every pull request.
- Turn on: Check for comment resolution.
- There are additional options that we won’t set at this time, but we’ll circle back to pre-merge build validation when we set up a continuous integration (CI) pipeline. That is a very important validation to ensure the main branch stays in a clean state.
- Click the Save changes button at the top of the page.
Note: there isn’t a project wide branch policy, so we will need to set these policies for everymain branch that we create.
Now we have protected our main branch, so return to the simple-rpg-game repo page. Let’s verify that changes cannot be made to our main branch:
- In the file list, select the README.md file. This will open the file in read mode.
- Click the Edit button at the top right. We can now edit the file.
- Just add some text at the end of the file… “Sample text”.
- Then, click the Commit button.
- In the Commit dialog, just click Commit again.
- You will get an error saying:
- TF402455: Pushes to this branch are not permitted; you must use a pull request to update this branch.
- Perfect! We’re protected from errant changes to our main branch.
- To get back to where we started, click the Revert button to undo our recent edits to the Readme file.
You can have a look at my source code repo to see how this is set up: https://dev.azure.com/d20Tek/SimpleRPG/_git/simple-rpg-game.
Well, we’re at a point where we have a code repository created in Azure DevOps. We’re ready to get started with our first coding experiment. We’ll take that up in our next installment.

2 thoughts on “Lesson 1.3: Setting up Azure DevOps”