Continuing with our use of the bUnit testing library for Blazor components. We will investigate how to create unit and component tests for pages/components that use both one-way and two-way data bindings. We will look at changing data on the page and performing actions (like button clicks) and then seeing how that impacts the page rendering. Finally, we will learn about xUnit’s [Theory] attribute to perform multiple variations of tests to validate different datasets without having to write individual, repeated test methods.
First, we must use a Blazor project and corresponding test project. If you don’t already have the projects created, please follow the steps in the How-To: Add bUnit Test Project to Blazor Solution article to get both projects and all of the required packages. For this article, we called the projects: Blazor.HowTo and Blazor.HowTo.Tests.
Setting Up
Then, we must create a page that uses data binding. We can follow the instructions in the How-To: Add Two Way Binding to Blazor Page article. Or just add the following page to our Blazor.HowTo project and Pages folder.
@page "/page-2"

<h3>Binary-Decimal Converter</h3>
<form class="form-row col-lg-4 col-md-12">
    <div class="form-group col-12">
        <label for="binary">Binary:</label>
        <input type="text" class="form-control" id="binary"
               placeholder="Enter binary number" @bind-value="@binary">
    </div>
    <div class="form-group col-12">
        <input id="convert-decimal" type="button"
               value="Convert to Decimal" @onclick=ConvertToDecimal />
    </div>
    <div class="form-group col-12">
        <label>Decimal Result: @result</label>
    </div>
</form>

@code {
    string binary;
    string result;

    void ConvertToDecimal()
    {
        try
        {
            result = Convert.ToInt32(binary, 2).ToString();
        }
        catch
        {
            result = "Error: not a valid binary number.";
        }
    }
}
Notice this page uses one-way binding for the result display text and to handle the button element onclick event. And it uses two-way binding for the source binary input control, so that users can provide the binary value to convert.
Writing Tests
We will write a couple of tests to validate the functionality of our binary-decimal converter above: the initial rendering of the page, and page rendering with a binary value converted to its decimal counterpart.
Let’s create our Page2Tests class in the Blazor.HowTo.Tests project and Pages folder (create the folder if it does not already exist).
using Blazor.HowTo.Pages;
using Bunit;
using Xunit;

namespace Blazor.HowTo.Tests.Pages
{
    public class Page2Tests
    {
        [Fact]
        public void InitialRender()
        {
            // arrange
            var ctx = new TestContext();

            // act
            var comp = ctx.RenderComponent<Page2>();

            // assert
            var expectedHtml =
@"<h3>Binary-Decimal Converter</h3>
<form class=""form-row col-lg-4 col-md-12"">
    <div class=""form-group col-12"">
        <label for=""binary"">Binary:</label>
        <input type=""text"" class=""form-control"" id=""binary""
               placeholder=""Enter binary number"">
    </div>
    <div class=""form-group col-12"">
        <input id=""convert-decimal"" type=""button"" value=""Convert to Decimal"" />
    </div>
    <div class=""form-group col-12"">
        <label>Decimal Result: </label>
    </div>
</form>
";
            comp.MarkupMatches(expectedHtml);
        }

        [Theory]
        [InlineData("101", "5")]
        [InlineData("10101", "21")]
        [InlineData("", "Error: not a valid binary number.")]
        [InlineData("102", "Error: not a valid binary number.")]
        public void ConvertToDecimal_WithBinaryValues(string initialBinary, string expectedResult)
        {
            // arrange
            var ctx = new TestContext();
            var comp = ctx.RenderComponent<Page2>();
            comp.Find("#binary").Change(initialBinary);

            // act
            comp.Find("#convert-decimal").Click();

            // assert
            var expectedHtml =
@$"<h3>Binary-Decimal Converter</h3>
<form class=""form-row col-lg-4 col-md-12"">
    <div class=""form-group col-12"">
        <label for=""binary"">Binary:</label>
        <input type=""text"" class=""form-control"" id=""binary""
               placeholder=""Enter binary number"" value=""{initialBinary}"">
    </div>
    <div class=""form-group col-12"">
        <input id=""convert-decimal"" type=""button"" value=""Convert to Decimal"" />
    </div>
    <div class=""form-group col-12"">
        <label>Decimal Result: {expectedResult}</label>
    </div>
</form>
";
            comp.MarkupMatches(expectedHtml);
        }
    }
}
The InitialRender method verifies that page’s initial state. There are no values set for the binary or result member variables, so they render as empty text on the page. We first create the bUnit TestContext to run our test. Then, we render the page using the RenderComponent method. Finally, we validate that the expected HTML (defined in raw text in lines #19-34) matches the markup in our rendered component.
The ConvertToDecimal_WithBinaryValues method takes parameters for the initial binary value and the expected conversion result. This method validates that the convert-decimal button performs the expected action and produces the expected result.
- First, the test setup creates the bUnit
TestContext, renders the defaultPage2, and then simulates the value change by setting the Page’s binary variable, using theChangemethod (line #48). - Then, we perform the test action on the page.
- The
Findmethod uses the CSS naming convention to find the'#convert-decimal'button on the page (the element with that id). - Then, it performs the
Clickaction on the returned element (line #51). - This fires the
onclickevent which in return calls thePage2.ConvertToDecimalmethod.
- The
- Finally, we validate the newly rendered page:
- We set up the expected HTML using the initial binary and expected result (lines #55-69).
- And we match it to the rendered markup.
Now, let’s look at the attributes on this method. First, the [Theory] attribute (line #38) tells the xUnit test runner that this method tests multiple cases. The following [InlineData] attributes (lines #39-42) represent the list of test cases to run with the data for each iteration. The parameter list of the [InlineData] attribute must match the test method’s parameter list (by number of parameters and their type). For this test, we run 4 different cases (2 perform the conversion, and 2 handle expected errors).
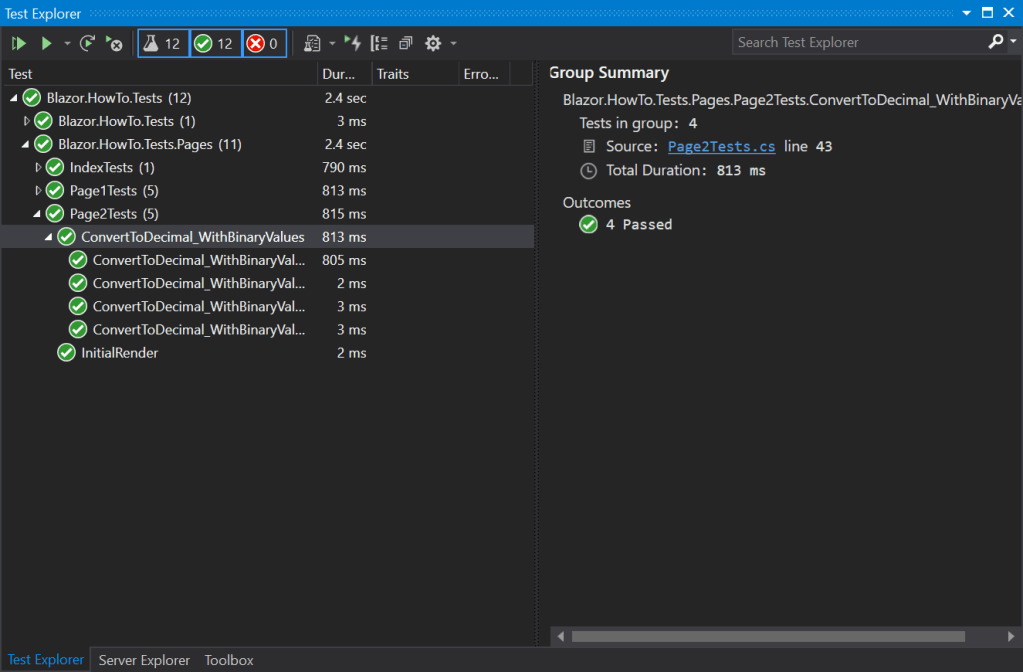
This is all of the test cases required to validate our conversion logic. Let’s build both projects and run the tests. All of the tests should pass and the Test Explorer should show the [Theory] variations as another level deep in the tree.
In conclusion, we have added unit and component tests that exercise our page with data bindings. In this lesson we learned:
- How to find HTML elements in our
TestContext. - How to perform actions on HTML elements to simulate HTML element changes and events.
- Deeper use of the
MarkupMatchesbUnit validation method. - How to set up a test method for re-use with input parameters.
- How to define variations of test cases using the xUnit
[Theory]and[InlineData]attributes.
