
Having created our unit test project in lesson 1.7, we are ready to start writing some tests. This lesson will focus on the mechanics of setting up our first test in xUnit, how to mock our IUniversityRepository dependency, and the strategy of which tests to write to cover all of the scenarios for our commands.
Reminder: you can find the source for this lesson in our Azure DevOps repo:Cli.Lesson1.6.UnitTests – Repos (azure.com). And these tests are targeting the source code in the Cli.Lesson1.6 project.
Create the Test Class
First, we are going to learn how to create a test class and method, focus on its structure, and then setup the required mock object for the test. These mechanics are similar in most of our test methods, so it’s important to understand these basics.
We need to create a new class named StudentListCommandTests in our Cli.Lesson1.6.UnitTests project and Commands folder. We use a couple of conventions here that are good to follow in your test projects:
- We name the test class to match the class being tested and append Tests to the name. This way it’s easy to tell that
StudentListCommandTestscontains the unit tests that target theStudentListCommandclass. - We create a matching folder structure for tests to match those in our app project. This makes it easier to find the test classes as our projects grow.
1. In the solution explorer and Commands folder, right click and select the ‘Add > Class’ item on the context menu.

- Just select a normal C# class named
StudentListCommandTests. - Press the ‘Add’ button.
- This will create an empty class that we are used to seeing.
Anatomy of a Test Method
Let’s add our first test method to our test class:
using Cli.Lessons.Commands;
using Cli.Lessons.Models;
using Cli.Lessons.Services;
using Moq;
using Spectre.Console.Cli;
using Spectre.Console;
using System;
using System.Collections.Generic;
using Xunit;

namespace Cli.Lesson1._6.UnitTests.Commands
{
    public class StudentListCommandTests
    {
        private readonly IRemainingArguments _remainingArgs = new Mock<IRemainingArguments>().Object;

        [Fact]
        public void Execute_WithEmptyList()
        {
            // arrange
            var repo = new Mock<IUniversityRepository>().Object;
            var command = new StudentListCommand(repo);
            var context = new CommandContext(_remainingArgs, "list", null);
            AnsiConsole.Record();

            // act
            var result = command.Execute(context);

            // assert
            Assert.Equal(0, result);
            var text = AnsiConsole.ExportText();
            Assert.Contains("# Students: 0", text);
        }
    }
}
- First, we notice that the test class does not need to be adorned with any attributes to specify that it is a test class. In xUnit, it assumes all public classes are test classes and will include them for discovery by the test runner.
- Then we define our test method (lines #17-18). Test methods must be public and return
void(unless they are async test methods, in which case they have the async identifier and returnTask). And the method has the[Fact]attribute. This attribute designates that this is a single test method.- If the class has a public method that does not have the
[Fact]attribute, then it is not considered a test method and not executed by the test runner.
- If the class has a public method that does not have the
- We call the test
Execute_WithEmptyListbecause we are testing theStudentListCommand.Executemethod and providing it with an empty list. It is important to descriptively name test methods, so we know what action they are performing and validating. When looking at test results, a good name can help us understand what is passing and failing quickly. - With just this defined, xUnit will attempt to run this method during a test run.
- Our tests are divided into 3 sections: arrange to setup the test dependencies, act to perform the test, and assert to verify that the test succeeded. We follow this pattern with all of our test methods, and it is a best practice in the unit testing domain.
- In line #21, we define a local variable for our repository. Then we instantiate a mock object using the
Mock<IUniversityRepository>type. TheMockclass is defined in the Moq framework that we installed into this project. It takes this interface and provides an implementation with methods that don’t do anything and always succeed. This line creates a repository that is empty, so when itsGetStudentsmethod is called, it will return an empty list, which is what we want for this test. - The
Mock<T>.Objectmethod returns the mock object by the type we desire…IUniversityRepositoryin our case, so that it can be used where we would use that interface. - In line #22, we create an instance of
StudentListCommandwith our mock repository. This is the command we will test. - If we look at the definition of the
Executemethod, we see that it takes aCommandContextas a parameter. This is a dependency that we must supply to the method call. In line #23, we create an instance ofCommandContextto use in our test call.- For the
remainingparameter, we pass a mockIRemainingArgsobject. We created this as a class member in line #15 because it is will be used across most of the tests in this class. - For the
nameparameter, this is simply the command configuration name… so “list” in this test. - For the
dataparameter, we just passnull. If we used command data in our execute method, we could pass that data as this parameter.
- For the
- The last arrangement step is to call the
AnsiConsole.Recordmethod (line #24), so that we can begin to capture output to theAnsiConsoleclass from the Spectre.Console package. This allows us to validate what is being written to the console window. - Then, in line #27, we test our actual code. We use the
StudentListCommandinstance and callExecuteon it with theCommandContext. - Then, we verify that we got the expected result from the method (line #30). 0 is a successful command execution.
- And we verify that “# Students: 0” was printed to the console window… that’s the expected behavior for an empty student repository (line #32).
This is a lot of explanation for a simple test, but it is the basis of structure and logic for many of our other tests. So take some time to review and digest the description because we will use it for the remainder of the test lessons.
Also, this is just scratching the surface of the capabilities of the xUnit and Moq frameworks. As we build more complex systems and tests, the additional capabilities of both really shine. I highly recommend that you dive deeply into each, because they are essential tools for successful software engineers.
Running the Test
We have a test, but haven’t run it yet or verified that it works as expected. We need to do that!
Let’s start building our projects, which will now include building the unit test project. After a successful build, we are ready to run our test.
- First, we must launch the Visual Studio Test Explorer by selecting main menu > Test > Test Explorer.
- In the test hierarchy, navigate from the project name to the namespace to the test class name (
StudentListCommandTests) to the method name (Execute_WithEmptyList). - Click the ‘Play All’ button in the top-left of the toolbar.
- Allow the test to run to completion.
- The test should succeed and show a green checkmark next to the method name.
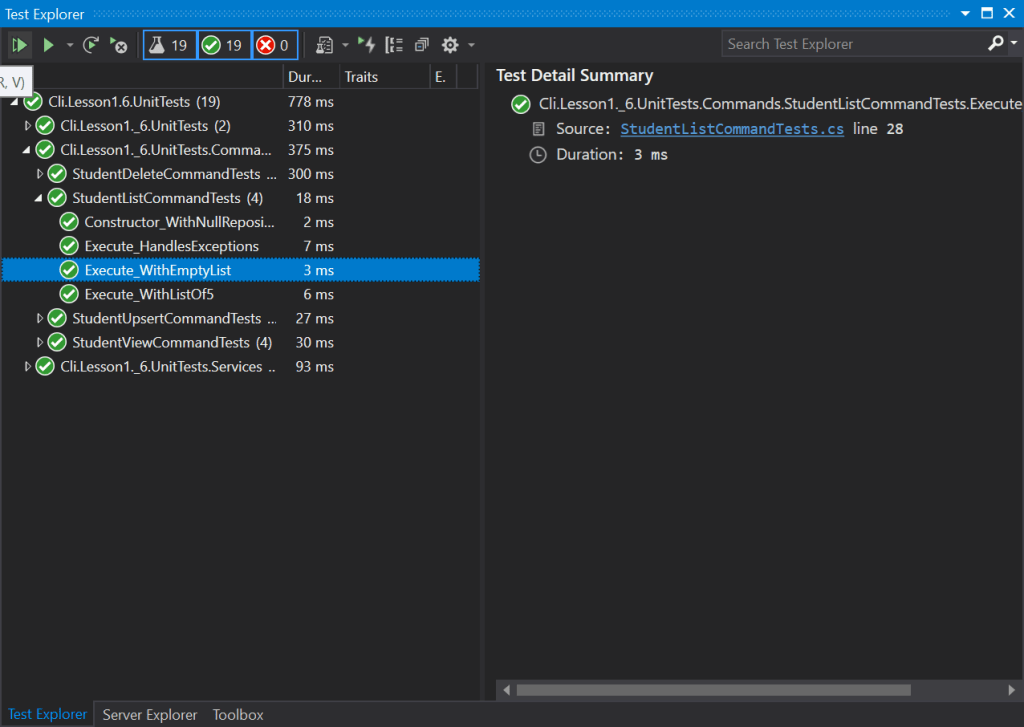
- The ‘Test Details Summary’ shows details about the selected test in the tree. If the test had failed, it would show any error details, exceptions, and the line of test code that failed. This window is a very helpful starting point for investigating failing tests.
But with our first test passing, we have come to a good stopping point. We covered a lot of details about our test logic, using xUnit to define test methods and validations, and using Moq to mock our repository. The details in this one test will be repeated and slightly altered numerous times to create the test suite for our commands. In the next lesson, we are going to fast forward through the remaining unit test classes.

2 thoughts on “Lesson 1.8: Our First Command Unit Test”