Now that we have the pieces in place, we are going to allow our players to fight these terrible monsters that are terrorizing the village. The initial combat simulation will be simple:
- the player will fight one monster at a time.
- attacks with weapons will always succeed.
- damage is rolled randomly based on the selected weapon and monster’s damage ability.
- if the monster is killed, player gets experience points, gold, and items.
- if the player is killed, they are teleported back home and fully healed.
This combat will will allow us to concentrate on bringing the whole game engine together. We will expand into more complex combat simulation later in the series.
Updating Model Classes
There are a set of model class changes that we need to make to enable monster combat:
1. To more easily get a list of weapons for the player, we are going to update the Inventory class to have a Weapons property. This property returns the items in the inventory whose type is Weapon.
using System;
using System.Collections.Generic;
using System.Linq;

namespace SimpleRPG.Game.Engine.Models
{
    public class Inventory
    {
        private readonly List<GameItem> _backingInventory = new List<GameItem>();
        private readonly List<GroupedInventoryItem> _backingGroupedInventory = new List<GroupedInventoryItem>();

        public Inventory(IEnumerable<GameItem> items)
        {
            if (items == null)
            {
                return;
            }

            foreach (GameItem item in items)
            {
                AddItem(item);
            }
        }

        public Inventory()
        {
        }

        public IReadOnlyList<GameItem> Items => _backingInventory.AsReadOnly();

        public IReadOnlyList<GroupedInventoryItem> GroupedItems => _backingGroupedInventory.AsReadOnly();

        public IEnumerable<GameItem> Weapons => _backingInventory.Where(i => i is Weapon);

        public void AddItem(GameItem item)
        {
            _ = item ?? throw new ArgumentNullException(nameof(item));

            _backingInventory.Add(item);

            if (item.IsUnique)
            {
                _backingGroupedInventory.Add(new GroupedInventoryItem { Item = item, Quantity = 1 });
            }
            else
            {
                if (_backingGroupedInventory.All(gi => gi.Item.ItemTypeID != item.ItemTypeID))
                {
                    _backingGroupedInventory.Add(new GroupedInventoryItem { Item = item, Quantity = 0 });
                }

                _backingGroupedInventory.First(gi => gi.Item.ItemTypeID == item.ItemTypeID).Quantity++;
            }
        }

        public void RemoveItem(GameItem item)
        {
            _ = item ?? throw new ArgumentNullException(nameof(item));

            _backingInventory.Remove(item);

            GroupedInventoryItem groupedInventoryItemToRemove =
                _backingGroupedInventory.FirstOrDefault(gi => gi.Item == item);

            if (groupedInventoryItemToRemove != null)
            {
                if (groupedInventoryItemToRemove.Quantity == 1)
                {
                    _backingGroupedInventory.Remove(groupedInventoryItemToRemove);
                }
                else
                {
                    groupedInventoryItemToRemove.Quantity--;
                }
            }
        }
    }
}
2. We refactor the Weapon class to get rid of the MinimumDamage and MaximumDamage properties and replace them with DamageRoll. DamageRoll will be a dice notation that we can randomly roll. Refactoring this class also involves updating the constructor and Clone methods accordingly.
namespace SimpleRPG.Game.Engine.Models
{
    public class Weapon : GameItem
    {
        public Weapon(int itemTypeID, string name, int price, string damageRoll)
            : base(itemTypeID, name, price, true)
        {
            DamageRoll = damageRoll;
        }

        public Weapon()
        {
        }

        public string DamageRoll { get; set; } = string.Empty;

        public override GameItem Clone() =>
            new Weapon(ItemTypeID, Name, Price, DamageRoll);
    }
}
3. We add a DamageRoll property to the Monster class (behaves just like the Weapon.DamageRoll property).
namespace SimpleRPG.Game.Engine.Models
{
    public class Monster : LivingEntity
    {
        public string ImageName { get; set; } = string.Empty;

        public int RewardExperiencePoints { get; set; }

        public string DamageRoll { get; set; } = string.Empty;
    }
}
Updating Factories
With the model classes all updated, we need to fix the corresponding factory classes (ItemFactory and MonsterFactory) to get our game to compile again.
For MonsterFactory, we just add the DamageRoll property and that data for each monster instance.
using SimpleRPG.Game.Engine.Models;
using SimpleRPG.Game.Engine.Services;
using System;

namespace SimpleRPG.Game.Engine.Factories
{
    internal static class MonsterFactory
    {
        private static readonly IDiceService _service = DiceService.Instance;

        public static Monster GetMonster(int monsterID)
        {
            switch (monsterID)
            {
                case 1:
                    Monster snake = new Monster
                    {
                        Name = "Snake",
                        ImageName = "/images/monsters/snake.png",
                        CurrentHitPoints = 4,
                        MaximumHitPoints = 4,
                        RewardExperiencePoints = 5,
                        Gold = 1,
                        DamageRoll = "1d2"
                    };

                    AddLootItem(snake, 9001, 25);
                    AddLootItem(snake, 9002, 75);
                    return snake;

                case 2:
                    Monster rat = new Monster
                    {
                        Name = "Rat",
                        ImageName = "/images/monsters/rat.png",
                        CurrentHitPoints = 5,
                        MaximumHitPoints = 5,
                        RewardExperiencePoints = 5,
                        Gold = 1,
                        DamageRoll = "1d2"
                    };

                    AddLootItem(rat, 9003, 25);
                    AddLootItem(rat, 9004, 75);
                    return rat;

                case 3:
                    Monster giantSpider = new Monster
                    {
                        Name ="Giant Spider",
                        ImageName = "/images/monsters/giant-spider.png",
                        CurrentHitPoints = 10,
                        MaximumHitPoints = 10,
                        RewardExperiencePoints = 10,
                        Gold = 3,
                        DamageRoll = "1d4"
                    };

                    AddLootItem(giantSpider, 9005, 25);
                    AddLootItem(giantSpider, 9006, 75);
                    return giantSpider;

                default:
                    throw new ArgumentOutOfRangeException(nameof(monsterID));
            }
        }

        private static void AddLootItem(Monster monster, int itemID, int percentage)
        {
            if (_service.Roll("1d100").Value <= percentage)
            {
                monster.Inventory.AddItem(ItemFactory.CreateGameItem(itemID));
            }
        }
    }
}
Then we update the DamageRoll in the weapons section of the ItemFactory.
using SimpleRPG.Game.Engine.Models;
using System.Collections.Generic;
using System.Linq;

namespace SimpleRPG.Game.Engine.Factories
{
    internal static class ItemFactory
    {
        private static readonly List<GameItem> _standardGameItems = new List<GameItem>
        {
            new Weapon(1001, "Pointy Stick", 1, "1d2"),
            new Weapon(1002, "Rusty Sword", 5, "1d3"),
            new GameItem(9001, "Snake fang", 1),
            new GameItem(9002, "Snakeskin", 2),
            new GameItem(9003, "Rat tail", 1),
            new GameItem(9004, "Rat fur", 2),
            new GameItem(9005, "Spider fang", 1),
            new GameItem(9006, "Spider silk", 2)
        };

        public static GameItem CreateGameItem(int itemTypeID)
        {
            var standardItem = _standardGameItems.First(i => i.ItemTypeID == itemTypeID);

            return standardItem.Clone();
        }
    }
}
With these changes, we should be able to build the game and run it again. There will be some changes needed to unit tests that tested this data as well. It’s good to have these tests in place when we refactor the code like this to ensure that we return to a working state by getting all of the tests to run successfully again.
Combat Method in GameSession
Now that we have completed the model class changes, we can implement the method to attack the monster in the current location. We will start by defining the AttackCurrentMonster method on the IGameSession interface.
using SimpleRPG.Game.Engine.Models;
using System.Collections.Generic;

namespace SimpleRPG.Game.Engine.ViewModels
{
    public interface IGameSession
    {
        Player CurrentPlayer { get; }

        Location CurrentLocation { get; }

        Monster? CurrentMonster { get; }

        bool HasMonster { get; }

        MovementUnit Movement { get; }

        IList<DisplayMessage> Messages { get; }

        void OnLocationChanged(Location newLocation);

        void AttackCurrentMonster(Weapon? currentWeapon);
    }
}
Then, we need to implement the actual method in the GameSession class:
using SimpleRPG.Game.Engine.Factories;
using SimpleRPG.Game.Engine.Models;
using SimpleRPG.Game.Engine.Services;
using System;
using System.Collections.Generic;
using System.Linq;

namespace SimpleRPG.Game.Engine.ViewModels
{
    public class GameSession : IGameSession
    {
        private readonly World _currentWorld;
        private readonly IDiceService _diceService;
        private readonly int _maximumMessagesCount = 100;

        public Player CurrentPlayer { get; private set; }

        public Location CurrentLocation { get; private set; }

        public Monster? CurrentMonster { get; private set; }

        public bool HasMonster => CurrentMonster != null;

        public MovementUnit Movement { get; private set; }

        public IList<DisplayMessage> Messages { get; } = new List<DisplayMessage>();

        public GameSession(int maxMessageCount)
            : this()
        {
            _maximumMessagesCount = maxMessageCount;
        }

        public GameSession(IDiceService? diceService = null)
        {
            _diceService = diceService ?? DiceService.Instance;

            CurrentPlayer = new Player
            {
                Name = "DarthPedro",
                CharacterClass = "Fighter",
                CurrentHitPoints = 10,
                MaximumHitPoints = 10,
                Gold = 1000,
                ExperiencePoints = 0,
                Level = 1
            };

            _currentWorld = WorldFactory.CreateWorld();

            Movement = new MovementUnit(_currentWorld);
            CurrentLocation = Movement.CurrentLocation;
            GetMonsterAtCurrentLocation();

            if (!CurrentPlayer.Inventory.Weapons.Any())
            {
                CurrentPlayer.Inventory.AddItem(ItemFactory.CreateGameItem(1001));
            }
        }

        public void OnLocationChanged(Location newLocation)
        {
            CurrentLocation = newLocation;
            Movement.UpdateLocation(CurrentLocation);
            GetMonsterAtCurrentLocation();
        }

        public void AttackCurrentMonster(Weapon? currentWeapon)
        {
            if (CurrentMonster is null)
            {
                return;
            }

            if (currentWeapon is null)
            {
                AddDisplayMessage("Combat Warning", "You must select a weapon, to attack.");
                return;
            }

            // Determine damage to monster
            int damageToMonster = _diceService.Roll(currentWeapon.DamageRoll).Value;

            if (damageToMonster == 0)
            {
                AddDisplayMessage("Player Combat", $"You missed the {CurrentMonster.Name}.");
            }
            else
            {
                CurrentMonster.CurrentHitPoints -= damageToMonster;
                AddDisplayMessage("Player Combat", $"You hit the {CurrentMonster.Name} for {damageToMonster} points.");
            }

            // If monster if killed, collect rewards and loot
            if (CurrentMonster.CurrentHitPoints <= 0)
            {
                var messageLines = new List<string>();
                messageLines.Add($"You defeated the {CurrentMonster.Name}!");

                CurrentPlayer.ExperiencePoints += CurrentMonster.RewardExperiencePoints;
                messageLines.Add($"You receive {CurrentMonster.RewardExperiencePoints} experience points.");

                CurrentPlayer.Gold += CurrentMonster.Gold;
                messageLines.Add($"You receive {CurrentMonster.Gold} gold.");

                foreach (GameItem item in CurrentMonster.Inventory.Items)
                {
                    CurrentPlayer.Inventory.AddItem(item);
                    messageLines.Add($"You received {item.Name}.");
                }

                AddDisplayMessage("Monster Defeated", messageLines);

                // Get another monster to fight
                GetMonsterAtCurrentLocation();
            }
            else
            {
                // If monster is still alive, let the monster attack
                int damageToPlayer = _diceService.Roll(CurrentMonster.DamageRoll).Value;

                if (damageToPlayer == 0)
                {
                    AddDisplayMessage("Monster Combat", "The monster attacks, but misses you.");
                }
                else
                {
                    CurrentPlayer.CurrentHitPoints -= damageToPlayer;
                    AddDisplayMessage("Monster Combat", $"The {CurrentMonster.Name} hit you for {damageToPlayer} points.");
                }

                // If player is killed, move them back to their home.
                if (CurrentPlayer.CurrentHitPoints <= 0)
                {
                    AddDisplayMessage("Player Defeated", $"The {CurrentMonster.Name} killed you.");

                    CurrentPlayer.CurrentHitPoints = CurrentPlayer.MaximumHitPoints; // Completely heal the player
                    this.OnLocationChanged(_currentWorld.LocationAt(0, -1)); // Return to Player's home
                }
            }
        }

        private void GetMonsterAtCurrentLocation()
        {
            CurrentMonster = CurrentLocation.HasMonster() ? CurrentLocation.GetMonster() : null;

            if (CurrentMonster != null)
            {
                AddDisplayMessage("Monster Encountered:", $"You see a {CurrentMonster.Name} here!");
            }
        }

        private void AddDisplayMessage(string title, string message) =>
            AddDisplayMessage(title, new List<string> { message });

        private void AddDisplayMessage(string title, IList<string> messages)
        {
            var message = new DisplayMessage(title, messages);
            this.Messages.Insert(0, message);

            if (Messages.Count > _maximumMessagesCount)
            {
                Messages.Remove(Messages.Last());
            }
        }
    }
}
There’s a lot of code in this file now and the AttackCurrentMonster is pretty long… longer than I usually like in my code. But we will get this version of the combat working, and then focus on refactoring and improving this code later.
Let’s review the changes in this view model:
- We add a parameter to the constructor to be able to pass in the
IDiceServiceto use. This is good for testing purposes, so that we can mock theIDiceServiceand test the view model with some specific dice results. It also allows us to use constructor injection of the service when we create the view model… review the lesson about Dependency Injection to refresh your memory. - We change the constructor to default to the
DiceServicesingleton if one is not specified. - We change the constructor to give the player a default weapon, if there isn’t one in their Inventory.
- The
AttackCurrentMonstermethod is what is called to referee combat between the player and monster. It does the following:- validates there is a current monster to fight in this location and the player has a weapon.
- the player deals random damage to the monster.
- if the monster dies, the player collects experience points, gold, and loot items.
- then the monster always respawns.
- next, the monster deals random damage to the player.
- if the player dies, they respawn in their home location and fully heal their damage.
- in all of these actions, we create detailed
DisplayMessagesto tell the player what is happening in the combat.
We have all the code we need now to bash those monsters. As part of the commit for this lesson, we will find a set of tests that validate the logic above in the AttackCurrentMonster method.
CombatComponent UI
With our monster combat logic in place, we can create another Blazor component to show the player their available weapons, allow them to select their attack weapon, and then perform the Attack! action.
We will create the new CombatComponent razor file in the SimpleRPG.Game project and in the Shared folder.
<Heading Size="HeadingSize.Is5" Margin="Margin.Is2.OnY">Combat</Heading>
<Row Margin="Margin.Is2.OnY">
    <Column ColumnSize="ColumnSize.Is6.Is2.WithOffset">
        <Select id="weapons-select" TValue="int">
        @foreach (Weapon weapon in WeaponList)
        {
            <SelectItem Value="@weapon.ItemTypeID">@weapon.Name</SelectItem>
        }
        </Select>
    </Column>
    <Column ColumnSize="ColumnSize.Is2">
        <Button id="attack-monster-btn" Color="Color.Secondary" Margin="Margin.Is1"
                Disabled="@disableAttack" Clicked="OnAttackClicked">
            Attack!
        </Button>
    </Column>
</Row>

@code {
    private bool disableAttack => !WeaponList.Any() || LocationHasMonster == false;
    private int selectedWeaponId;

    [Parameter]
    public IEnumerable<GameItem> WeaponList { get; set; } = Array.Empty<Weapon>();

    [Parameter]
    public bool LocationHasMonster { get; set; } = false;

    [Parameter]
    public EventCallback<Weapon?> AttackClicked { get; set; }

    protected override void OnInitialized()
    {
        selectedWeaponId = WeaponList.Any() ? WeaponList.First().ItemTypeID : 0;
    }

    public void OnAttackClicked()
    {
        var weapon = selectedWeaponId > 0 ? WeaponList.First(f => f.ItemTypeID == selectedWeaponId) : null;
        AttackClicked.InvokeAsync(weapon as Weapon);
    }
}
The rendering of this control is pretty straightforward. We create a centered select list and attack button. The Blazorise <Select> component creates a selector similar to a dropdown list. It enumerates through the WeaponList parameter creating a select option for each weapon. Then, we define an Attack button that enables/disables based on the disableAttack variable. And performs a Clicked event when the user clicks the button.
In the component code section, we do some light coding to make the component interactive. This is very similar to the work we did in the MovementComponent in lesson 2.10. We:
- Define three parameters for users to set:
WeaponList,LocationHasMonster, andAttackClicked. disableAttacklogic is based on being in a location with no monsters or an empty weapons list. This variable drives whether the attack button is enabled or disabled.- Initialize the
selectedWeaponIdto the first item in theWeaponList. - Finally, handle the
OnAttackClickedmethod by getting the selected weapon and firing theAttackClickedevent callback so that our parent view and view model to perform the attack action.
With the component complete, we need to add it to the MainScreen again.
@page "/"
@inject IGameSession ViewModel

<Row Margin="Margin.Is0" Style="height: 5vh; min-height: 32px">
    <Column ColumnSize="ColumnSize.Is12" Style="background-color: lightgrey">
        <Heading Size="HeadingSize.Is3">Simple RPG</Heading>
    </Column>
</Row>
<Row Margin="Margin.Is0" Style="height: 60vh">
    <Column ColumnSize="ColumnSize.Is3.OnWidescreen.Is12" Style="background-color: aquamarine">
        <PlayerComponent Player="@ViewModel.CurrentPlayer" />
    </Column>
    <Column ColumnSize="ColumnSize.Is9.OnWidescreen.Is12" Style="background-color: beige">
        <Row Margin="Margin.Is2.OnY">
            <Column ColumnSize="ColumnSize.Is8.OnWidescreen.Is12">
                <DisplayMessageListView Messages="@ViewModel.Messages" />
            </Column>
            <Column ColumnSize="ColumnSize.Is4.OnWidescreen.Is12">
                <LocationComponent Location="@ViewModel.CurrentLocation" />
                <MonsterComponent Monster="@ViewModel.CurrentMonster" />
            </Column>
        </Row>
    </Column>
</Row>
<Row Margin="Margin.Is0" Style="height: 33vh">
    <Column ColumnSize="ColumnSize.Is3.OnWidescreen.Is12" Padding="Padding.Is2.OnY"
            Style="background-color: burlywood">
        <PlayerTabs Player="@ViewModel.CurrentPlayer" />
    </Column>
    <Column ColumnSize="ColumnSize.Is9.OnWidescreen.Is12" Style="background-color: lavender">
        <Row Margin="Margin.Is2.OnY">
            <Column ColumnSize="ColumnSize.Is8.OnWidescreen.Is12">
                <CombatComponent WeaponList="@ViewModel.CurrentPlayer.Inventory.Weapons"
                                 AttackClicked="@ViewModel.AttackCurrentMonster"
                                 LocationHasMonster="@ViewModel.HasMonster"/>
            </Column>
            <Column ColumnSize="ColumnSize.Is4.OnWidescreen.Is12">
                <MovementComponent Movement="@ViewModel.Movement" LocationChanged="@ViewModel.OnLocationChanged" />
            </Column>
        </Row>
    </Column>
</Row>
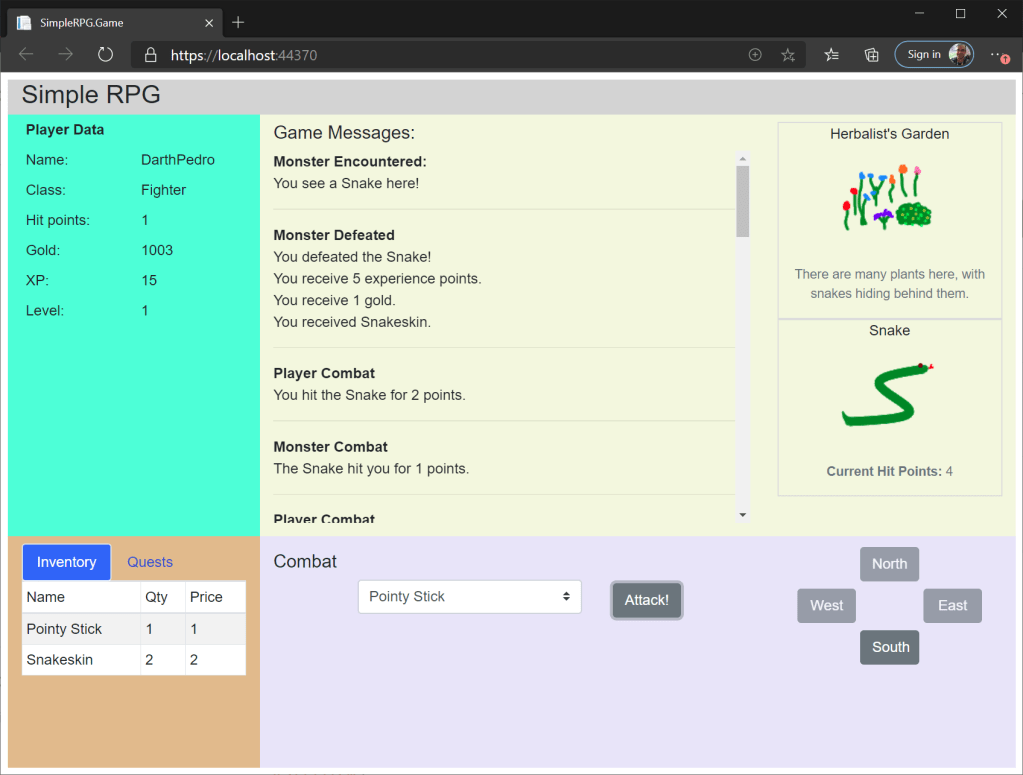
With all of the UI changes in place, we are in a good spot to build and run the game again. If we navigate to a location with a monster in it (like the herbalist’s garden), we can fight the snakes there. Just click the Attack button until to kill a snake or two. You should see the following:
Our game features are growing quite nicely. Now that we can fight monsters, this is starting to feel like a real game. We will continue to work on features for traders and quests in the remainder of this chapter.
