Showing the player’s location is the first step, but we also need to provide the ability to move around our game world. We’re going to build some controls and event handlers that move the player between adjacent locations in the world.
To begin we’re going to create a new view model class to assist with movement.
Create MovementUnit
In the SimpleRPG.Game.Engine project and ViewModels folder, create the MovementUnit class. This code could have all been included in the GameSession view model (in fact in the original WPF tutorial it is). But I wanted to keep the movement code in its own class and not pollute the GameSession with all of the nuances of handling moves. So, I created the following class:
using Microsoft.AspNetCore.Components;
using SimpleRPG.Game.Engine.Models;
using System;

namespace SimpleRPG.Game.Engine.ViewModels
{
    public class MovementUnit
    {
        private readonly World world;

        public MovementUnit(World world)
        {
            this.world = world ?? throw new ArgumentNullException(nameof(world));
            this.CurrentLocation = world.GetHomeLocation();
        }

        public Location CurrentLocation { get; private set; }

        public EventCallback<Location> LocationChanged { get; set; }

        public bool CanMoveNorth =>
            this.world.HasLocationAt(this.CurrentLocation.XCoordinate, this.CurrentLocation.YCoordinate + 1);

        public bool CanMoveEast =>
            this.world.HasLocationAt(this.CurrentLocation.XCoordinate + 1, this.CurrentLocation.YCoordinate);

        public bool CanMoveSouth =>
            this.world.HasLocationAt(this.CurrentLocation.XCoordinate, this.CurrentLocation.YCoordinate - 1);

        public bool CanMoveWest =>
            this.world.HasLocationAt(this.CurrentLocation.XCoordinate - 1, this.CurrentLocation.YCoordinate);

        public void MoveNorth() =>
            this.MoveBase(this.CurrentLocation.XCoordinate, this.CurrentLocation.YCoordinate + 1);

        public void MoveEast() =>
            this.MoveBase(this.CurrentLocation.XCoordinate + 1, this.CurrentLocation.YCoordinate);

        public void MoveSouth() =>
            this.MoveBase(this.CurrentLocation.XCoordinate, this.CurrentLocation.YCoordinate - 1);

        public void MoveWest() =>
            this.MoveBase(this.CurrentLocation.XCoordinate - 1, this.CurrentLocation.YCoordinate);

        private void MoveBase(int xCorridate, int yCoordinate)
        {
            if (this.world.HasLocationAt(xCorridate, yCoordinate))
            {
                this.CurrentLocation = this.world.LocationAt(xCorridate, yCoordinate);
                this.LocationChanged.InvokeAsync(this.CurrentLocation);
            }
        }
    }
}
This class has a constructor that takes a World object. The world data is required to calculate the move, so we need to have that information.
Then, we define for several properties CanMoveX. These properties let us know whether a move is possible in each direction. Each property check for adjacent spaces from the current location by one coordinate in either the x or y directions.
These properties (like lines #21-22) use the lambda operator (=>) and getter-only expressions. This is short hand for creating a property with only a get operation, and that getter returns the value of the call this.world.HasLocationAt. The full code for this would be:
public bool CanMoveNorth
{
    get
    {
        return this.world.HasLocationAt(this.CurrentLocation.XCoordinate, this.CurrentLocation.YCoordinate + 1);
    }
}
The same lambda operator can also be used as method bodies, like in the MoveNorth method.
These properties are followed by the MoveX functions. These methods move the current location to the next adjacent location by moving one step in the x or y directions. If there are no moves in the direction, the operation is skipped. The method checks the corresponding CanMoveX property to guard against moving to an invalid location.
Then, the move functions call the: this.LocationChanged.InvokeAsync(this.CurrentLocation) method to invoke an event and notify any registered event handlers that the current location has changed. This event is used later by the Blazor component to be notified that the LocationComponent can update in response to a location change.
EventCallback<Location> is the Blazor mechanism for defining, registering, and invoking events. Events are loosely-coupled ways to share changes across view models and components, and between components. By defining the EventCallback with a Location type, any event handler for this must be a method that takes a single Location parameter with no return value. We will see that event handler later in this lesson.
Change to World Class
As you can see in the MovementUnit class, we added the World.HasLocationAt method. This method checks whether the specified x and y coordinates have a location. It returns true if there is a location there, and returns false if there is no location at those coordinates. So let’s update the World class to the latest code:
using System;
using System.Collections.Generic;
using System.Linq;

namespace SimpleRPG.Game.Engine.Models
{
    public class World
    {
        private readonly IList<Location> locations;

        public World(IEnumerable<Location> locs)
        {
            this.locations = locs is null ? new List<Location>() : locs.ToList();
        }

        public Location LocationAt(int xCoordinate, int yCoordinate)
        {
            var loc = locations.FirstOrDefault(p => p.XCoordinate == xCoordinate && p.YCoordinate == yCoordinate);
            return loc ?? throw new ArgumentOutOfRangeException("Coordinates", "Provided coordinates could not be found in game world.");
        }

        public bool HasLocationAt(int xCoordinate, int yCoordinate)
        {
            return locations.Any(p => p.XCoordinate == xCoordinate && p.YCoordinate == yCoordinate);
        }

        public Location GetHomeLocation()
        {
            return this.LocationAt(0, -1);
        }
    }
}
Movement Component
Now that we have the MovementUnit defined, we need to create a component that shows movement buttons for all of the directions. Again, we’re going to make this a component with a parameter to pass in the MovementUnit property.
In the SimpleRPG.Game project and Shared folder, create a new MovementComponent with the following code:
@if (Movement != null)
{
<Row>
    <Column Class="text-center">
        <Button id="move-north-btn" Color="Color.Secondary" Margin="Margin.Is1"
                Disabled="@(!Movement.CanMoveNorth)" Clicked="Movement.MoveNorth"
                Style="width: 65px">
            North
        </Button>
    </Column>
</Row>
<Row>
    <Column Class="text-center">
        <Button id="move-west-btn" Color="Color.Secondary" Margin="Margin.Is1"
                Disabled="@(!Movement.CanMoveWest)" Clicked="Movement.MoveWest"
                Style="width: 65px">
            West
        </Button>
    </Column>
    <Column Class="text-center">
        <Button id="move-east-btn" Color="Color.Secondary" Margin="Margin.Is1"
                Disabled="@(!Movement.CanMoveEast)" Clicked="Movement.MoveEast"
                Style="width: 65px">
            East
        </Button>
    </Column>
</Row>
<Row>
    <Column Class="text-center">
        <Button id="move-south-btn" Color="Color.Secondary" Margin="Margin.Is1"
                Disabled="@(!Movement.CanMoveSouth)" Clicked="Movement.MoveSouth"
                Style="width: 65px">
            South
        </Button>
    </Column>
</Row>
}

@code {
    [Parameter]
    public MovementUnit? Movement { get; set; }

    [Parameter]
    public EventCallback<Location> LocationChanged
    {
        get => (Movement is null) ? default : Movement.LocationChanged;
        set
        {
            if (Movement != null)
            {
                Movement.LocationChanged = value;
            }
        }
    }
}
We use <Row> and <Column> Blazorise components again to set up the grid for the 4 direction buttons. We use this layout so that the buttons stay in formation regardless of how the game screen is resized.
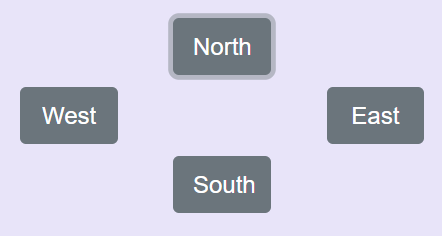
As we can see, each button is defined in a similar manner and repeated but bound to different properties and event handlers. Each one has:
- Unique id per button, so that it can be search for in tests and by UI automation tools.
- Gray fill color for the button
- Sized to 65 pixels wide
- Disabled property is bound to the CanMoveX property (i.e.:
CanMoveNorth)- Note: the Disabled property binding actually negates the
CanMoveNorthproperty because we only want the buttons disabled when you cannot move in that direction.
- Note: the Disabled property binding actually negates the
- Clicked event is bound to the MoveX method (i.e.:
MoveNorth) to perform the move
This should be pretty familiar now, given how we built the PlayerComponent and LocationComponent. The new concept here is the Event binding. <Button> has a Clicked event, and we bind that event to a handler in the MovementUnit view model. In Blazor, we can bind events directly to methods (with the appropriate method signature), even in view model classes.
This capability makes it easier to support MVVM and event binding. In other MVVM implementations (for WPF and UWP), we would have to support ICommand in view model command properties to enable button click – command routing. Blazor short-circuits some of those requirements. (You can still define and use the ICommand properties if you are building library code that needs to work across these different models.)
In the @code segment, the Movement parameter is defined (just like we did in the other components). But this property is nullable… meaning that it is allowed to be set to null, so we validate that it is set in our component markup.
Finally, you see a parameter defined for LocationChanged:
[Parameter]
public EventCallback<Location> LocationChanged
{
    get => (Movement is null) ? default : Movement.LocationChanged;
    set
    {
        if (Movement != null)
        {
            Movement.LocationChanged = value;
        }
    }
}
Because the LocationChanged property is of type EventCallback<T>, we are defining an event for our component. And the event is fired to notify other components of the location change. The code in this property has to deal with the Movement property being null; otherwise, it just forwards the LocationChanged getter and setter to the MovementUnit.LocationChanged event that we defined in the first part of this lesson. This forwarding of properties allows us to have events accessible in our view models and invoke those event handlers from there.
GameSession Changes
Now we need to surface the MovementUnit and LocationChanged event handler in our GameSession view model. We will start by updating the IGameSession interface:
using SimpleRPG.Game.Engine.Models;

namespace SimpleRPG.Game.Engine.ViewModels
{
    public interface IGameSession
    {
        Player CurrentPlayer { get; }

        Location CurrentLocation { get; }

        MovementUnit Movement { get; }

        void OnLocationChanged(Location newLocation);
    }
}
Then we need to add the new property and method to the GameSession class too:
using SimpleRPG.Game.Engine.Factories;
using SimpleRPG.Game.Engine.Models;

namespace SimpleRPG.Game.Engine.ViewModels
{
    public class GameSession : IGameSession
    {
        private readonly World currentWorld;

        public Player CurrentPlayer { get; private set; }

        public Location CurrentLocation { get; private set; }

        public MovementUnit Movement { get; private set; }

        public GameSession()
        {
            this.CurrentPlayer = new Player
            {
                Name = "DarthPedro",
                CharacterClass = "Fighter",
                HitPoints = 10,
                Gold = 1000,
                ExperiencePoints = 0,
                Level = 1
            };

            this.currentWorld = WorldFactory.CreateWorld();

            this.Movement = new MovementUnit(this.currentWorld);
            this.CurrentLocation = this.Movement.CurrentLocation;
        }

        public void OnLocationChanged(Location newLocation) =>
            this.CurrentLocation = newLocation;
    }
}
The Movement property is just a simple C# property.
The OnLocationChanged method takes a new Location object and has no return value. This is the method signature required by the event we defined in the MovementComponent. EventCallback<Location>. In response to this event, we just update the GameSesson.CurrentLocation property, and because of databinding, our LocationComponent will change which location it shows.
Adding Movement to MainScreen
The last step is to add the MovementComponent to the game screen (as we’ve done with a couple of other components). Let’s modify the MainScreen to the following code:
@page "/"
@inject IGameSession ViewModel

<Row Style="height: 5vh; min-height: 32px">
    <Column ColumnSize="ColumnSize.Is12" Style="background-color: aliceblue">
        <Heading Size="HeadingSize.Is3">Simple RPG</Heading>
    </Column>
</Row>
<Row Style="height: 60vh">
    <Column ColumnSize="ColumnSize.Is3.OnWidescreen.Is12" Style="background-color: aquamarine">
        <PlayerComponent Player="@ViewModel.CurrentPlayer" />
    </Column>
    <Column ColumnSize="ColumnSize.Is9.OnWidescreen.Is12" Style="background-color: beige">
        <Row Margin="Margin.Is2.OnY">
            <Column ColumnSize="ColumnSize.Is8.OnWidescreen.Is12">
                Game Data
            </Column>
            <Column ColumnSize="ColumnSize.Is4.OnWidescreen.Is12">
                <LocationComponent Location="@ViewModel.CurrentLocation" />
            </Column>
        </Row>
    </Column>
</Row>
<Row Style="height: 30vh">
    <Column ColumnSize="ColumnSize.Is3.OnWidescreen.Is12" Style="background-color: burlywood">
        Inventory/Quest
    </Column>
    <Column ColumnSize="ColumnSize.Is9.OnWidescreen.Is12" Style="background-color: lavender">
        <Row Margin="Margin.Is2.OnY">
            <Column ColumnSize="ColumnSize.Is8.OnWidescreen.Is12">
                Combat Controls
            </Column>
            <Column ColumnSize="ColumnSize.Is4.OnWidescreen.Is12">
                <MovementComponent Movement="@ViewModel.Movement" LocationChanged="@ViewModel.OnLocationChanged" />
            </Column>
        </Row>
    </Column>
</Row>
We place the <MovementComponent> in the bottom right quadrant of the game screen. Then, set its parameters:
Movementis set to theMovementUnitview model that is exposed by theGameSession.LocationChangedis bound to theGameSession.OnLocationChangedevent handler.
That’s all it takes to hook up the components and classes we’ve built and updated throughout this lesson. Now, we can build and run the game to see the new movement controls.
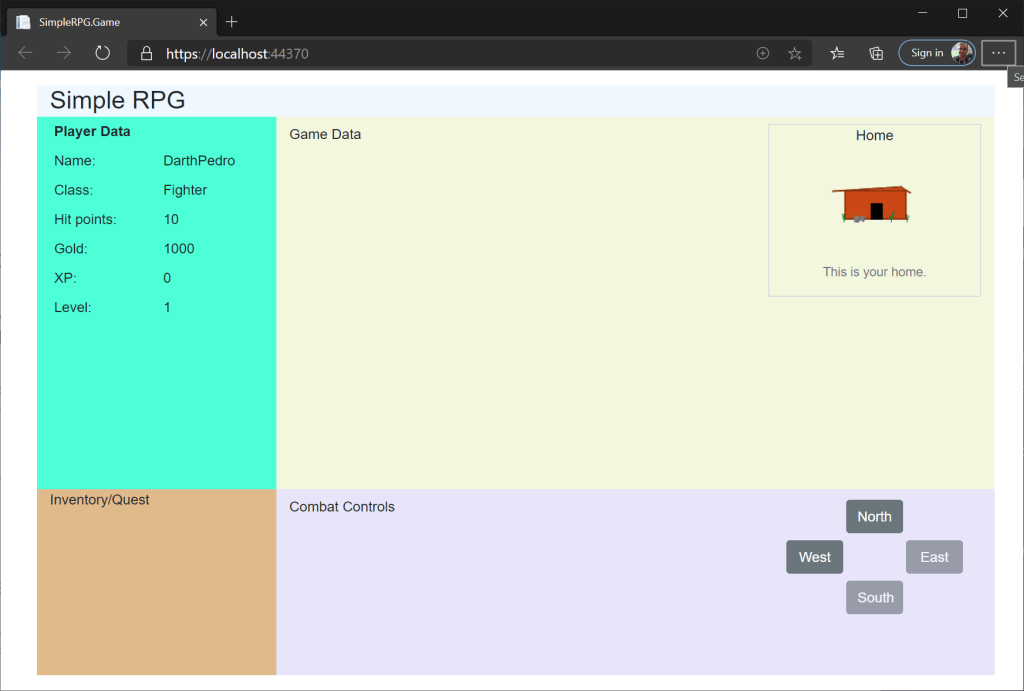
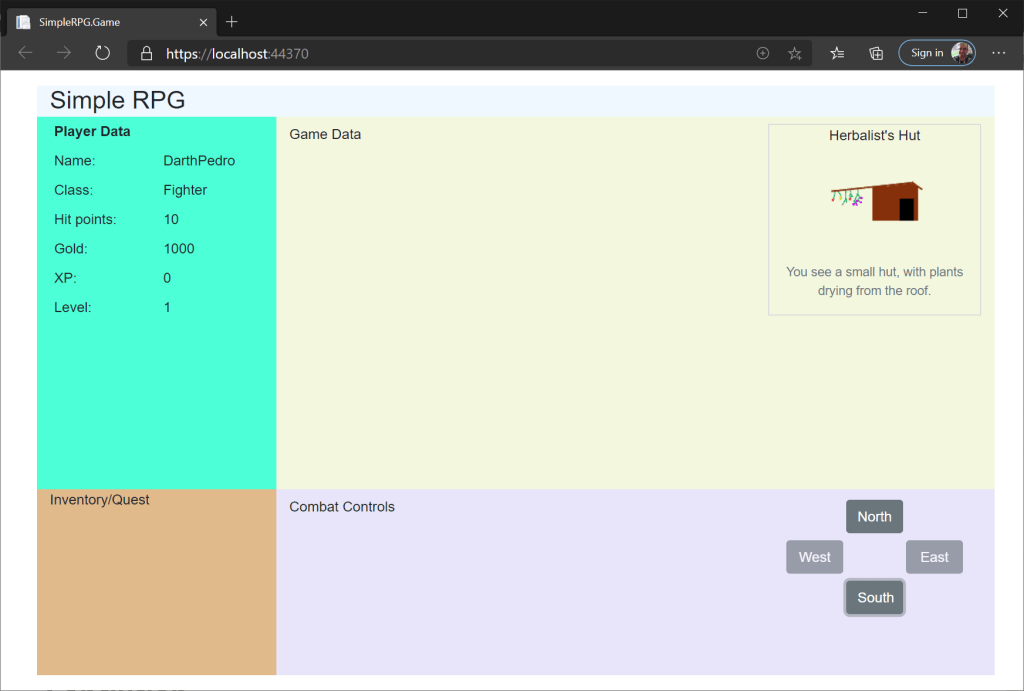
Let’s navigate the game world by clicking on the enabled buttons and moving throughout our small game world. We should be able to get to all of our locations and view all of the images and text for each.
Conclusion
With this lesson, we’ve added some interactivity to our game. We are now able to move around the game world. If we wanted to make a bigger area, we certainly can do that by adding more connected locations. Our navigation buttons respond (enable/disable) based on the ability to move in certain directions (so the size of the game world does not matter). And, we don’t allow the player to move outside of our intended game area.
As we showed in earlier lessons, we developed a set of unit tests to validate the movement functionality and verify that we allow players to only move to valid locations. You can take a look at the tests that are part of this lesson’s commit. The unit tests are just move examples of tests that we showed in earlier lessons, so we’re not going to discuss them again. But it is always a good idea to look at the tests and see how they validate our game functionality.
Our game engine is taking shape. We will continue to develop richer features as we move into the next chapter.

In the GameSessions code, you are missing highlights for line 30-31. It took me a while to debug that.
LikeLike
Thanks for the feedback. I have updated the code snippet to include those highlighted lines. I hope you’re enjoying the sample.
LikeLike