Being able to create monsters is great, but now we need to put them out into our game world and be able to interact with them. To do that, we are going to build some code that adds monsters and encounters to particular locations in the game world. Then, we will enable a MonsterComponent to show a Monster when we reach a location where one is located.
Create Monster Encounter
To tie monsters to locations randomly, we are going to introduce a new class, the MonsterEncounter. Let’s create MonsterEncounter in the SimpleRPG.Game.Engine and Models folder.
namespace SimpleRPG.Game.Engine.Models
{
    public class MonsterEncounter
    {
        public MonsterEncounter(int monsterId, int chanceOfEncountering)
        {
            MonsterId = monsterId;
            ChanceOfEncountering = chanceOfEncountering;
        }

        public MonsterEncounter()
        {
        }

        public int MonsterId { get; set; }

        public int ChanceOfEncountering { get; set; }
    }
}
This class is pretty simple. It holds a monster’s id and the probability (chance) of finding the monster at a particular location. This is just a data class that we will use in our Location and WorldFactory classes.
Now, we will update the Location class to have some broader capabilities. Namely, the location will be able to track the potential monsters at that location, the ability to add monster encounters that will be used in the WorldFactory, and then the GetMonster method used by the GameSession to retrieve monsters when the player’s location changes.
using SimpleRPG.Game.Engine.Factories;
using SimpleRPG.Game.Engine.Services;
using System;
using System.Collections.Generic;
using System.Linq;

namespace SimpleRPG.Game.Engine.Models
{
    public class Location
    {
        public int XCoordinate { get; set; }

        public int YCoordinate { get; set; }

        public string Name { get; set; } = string.Empty;

        public string Description { get; set; } = string.Empty;

        public string ImageName { get; set; } = string.Empty;

        public IList<MonsterEncounter> MonstersHere { get; set; } = new List<MonsterEncounter>();

        public void AddMonsterEncounter(int monsterId, int chanceOfEncountering)
        {
            if (MonstersHere.Any(m => m.MonsterId == monsterId))
            {
                // this monster has already been added to this location.
                // so overwrite the ChanceOfEncountering with the new number.
                MonstersHere.First(m => m.MonsterId == monsterId)
                            .ChanceOfEncountering = chanceOfEncountering;
            }
            else
            {
                // this monster is not already at this location, so add it.
                MonstersHere.Add(new MonsterEncounter(monsterId, chanceOfEncountering));
            }
        }

        public bool HasMonster() => MonstersHere.Any();

        public Monster GetMonster()
        {
            if (HasMonster() == false)
            {
                throw new InvalidOperationException();
            }

            // total the percentages of all monsters at this location.
            int totalChances = MonstersHere.Sum(m => m.ChanceOfEncountering);

            // Select a random number between 1 and the total (in case the total chances is not 100).
            var result = DiceService.Instance.Roll(totalChances);

            // loop through the monster list,
            // adding the monster's percentage chance of appearing to the runningTotal variable.
            // when the random number is lower than the runningTotal, that is the monster to return.
            int runningTotal = 0;

            foreach (MonsterEncounter monsterEncounter in MonstersHere)
            {
                runningTotal += monsterEncounter.ChanceOfEncountering;

                if (result.Value <= runningTotal)
                {
                    return MonsterFactory.GetMonster(monsterEncounter.MonsterId);
                }
            }

            // If there was a problem, return the last monster in the list.
            return MonsterFactory.GetMonster(MonstersHere.Last().MonsterId);
        }
    }
}
To store the MonsterEncounter objects, we added the MonstersHere property. Then we added the AddMonsterEncounter method. Rather than directly manipulating the MonstersHere list, we use the AddMonsterEncounter method to make additional checks. We only want to add one monster type to the list per location. If we add duplicate monster type ids, then we just change the ChanceOfEncountering to the new value. If the monster id is not already in the list, then we create a new MonsterEncounter and add it to the list.
The GetMonster method will determine which monster the location contains, and will instantiate a new Monster object for the player to fight. It generates a random number and picks the appropriate monster from the list.
If the method hasn’t selected a monster, the final line of the method will return the last MonsterEncounter object in the list.
Adding Monsters to the Game World
Now we need to add monsters to various locations in the WorldFactory.CreateWorld method. We will add rats to the farmer’s field, snakes to the herbalist’s garden, and spiders to the forest.
using SimpleRPG.Game.Engine.Models;
using System.Collections.Generic;

namespace SimpleRPG.Game.Engine.Factories
{
    internal static class WorldFactory
    {
        internal static World CreateWorld()
        {
            var locations = new List<Location>
            {
                new Location
                {
                    XCoordinate = -2,
                    YCoordinate = -1,
                    Name = "Farmer's Field",
                    Description = "There are rows of corn growing here, with giant rats hiding between them.",
                    ImageName = "/images/locations/FarmFields.png"
                },
                new Location
                {
                    XCoordinate = -1,
                    YCoordinate = -1,
                    Name = "Farmer's House",
                    Description = "This is the house of your neighbor, Farmer Ted.",
                    ImageName = "/images/locations/Farmhouse.png"
                },
                new Location
                {
                    XCoordinate = 0,
                    YCoordinate = -1,
                    Name = "Home",
                    Description = "This is your home.",
                    ImageName = "/images/locations/Home.png"
                },
                new Location
                {
                    XCoordinate = -1,
                    YCoordinate = 0,
                    Name = "Trading Shop",
                    Description = "The shop of Susan, the trader.",
                    ImageName = "/images/locations/Trader.png"
                },
                new Location
                {
                    XCoordinate = 0,
                    YCoordinate = 0,
                    Name = "Town Square",
                    Description = "You see a fountain here.",
                    ImageName = "/images/locations/TownSquare.png"
                },
                new Location
                {
                    XCoordinate = 1,
                    YCoordinate = 0,
                    Name = "Town Gate",
                    Description = "There is a gate here, protecting the town from giant spiders.",
                    ImageName = "/images/locations/TownGate.png"
                },
                new Location
                {
                    XCoordinate = 2,
                    YCoordinate = 0,
                    Name = "Spider Forest",
                    Description = "The trees in this forest are covered with spider webs.",
                    ImageName = "/images/locations/SpiderForest.png"
                },
                new Location
                {
                    XCoordinate = 0,
                    YCoordinate = 1,
                    Name = "Herbalist's Hut",
                    Description = "You see a small hut, with plants drying from the roof.",
                    ImageName = "/images/locations/HerbalistsHut.png"
                },
                new Location
                {
                    XCoordinate = 0,
                    YCoordinate = 2,
                    Name = "Herbalist's Garden",
                    Description = "There are many plants here, with snakes hiding behind them.",
                    ImageName = "/images/locations/HerbalistsGarden.png"
                },
            };

            var newWorld = new World(locations);

            // add monsters at their particular location.
            newWorld.LocationAt(-2, -1).AddMonsterEncounter(2, 100);
            newWorld.LocationAt(2, 0).AddMonsterEncounter(3, 100);
            newWorld.LocationAt(0, 2).AddMonsterEncounter(1, 100);

            return newWorld;
        }
    }
}
With the game world set, we need to update the GameSession view model to keep track of a current monster (like we do with the CurrentPlayer). When the player moves to new location, we will check if the location has monsters. If it does, we get a monster object and set it to the CurrentMonster property. Then we will use that monster to display its information on the game screen.
First, let’s update the IGameSession interface to have the CurrentMonster property and a HasMonster property.
using SimpleRPG.Game.Engine.Models;

namespace SimpleRPG.Game.Engine.ViewModels
{
    public interface IGameSession
    {
        Player CurrentPlayer { get; }

        Location CurrentLocation { get; }

        Monster? CurrentMonster { get; }

        bool HasMonster { get; }

        MovementUnit Movement { get; }

        void OnLocationChanged(Location newLocation);
    }
}
And then we implement the interface changes in GameSession:
using SimpleRPG.Game.Engine.Factories;
using SimpleRPG.Game.Engine.Models;

namespace SimpleRPG.Game.Engine.ViewModels
{
    public class GameSession : IGameSession
    {
        private readonly World _currentWorld;

        public Player CurrentPlayer { get; private set; }

        public Location CurrentLocation { get; private set; }

        public Monster? CurrentMonster { get; private set; }

        public bool HasMonster => CurrentMonster != null;

        public MovementUnit Movement { get; private set; }

        public GameSession()
        {
            CurrentPlayer = new Player
            {
                Name = "DarthPedro",
                CharacterClass = "Fighter",
                CurrentHitPoints = 10,
                MaximumHitPoints = 10,
                Gold = 1000,
                ExperiencePoints = 0,
                Level = 1
            };

            _currentWorld = WorldFactory.CreateWorld();

            Movement = new MovementUnit(_currentWorld);
            CurrentLocation = Movement.CurrentLocation;
            GetMonsterAtCurrentLocation();

            CurrentPlayer.Inventory.AddItem(ItemFactory.CreateGameItem(1001));
        }

        public void OnLocationChanged(Location newLocation)
        {
            CurrentLocation = newLocation;
            GetMonsterAtCurrentLocation();
        }

        private void GetMonsterAtCurrentLocation() =>
            CurrentMonster = CurrentLocation.HasMonster() ? CurrentLocation.GetMonster() : null;
    }
}
The GetMonsterAtCurrentLocation method sets the CurrentMonster if the location has one; otherwise if gets set to null. And, when the CurrentMonster is null, the HasMonster calculated property will be false.
When we handle the OnLocationChanged event, we then call the GetMonsterAtCurrentLocation, so that when the player moves locations CurrentMonster gets set accordingly. This allows us to now update the UI and setup the combat system.
Displaying The MonsterComponent
Now that we know when there is a monster at a location, we want to show the monster at that location. If you remember the Monster class we defined in the last lesson, it has a Name and ImageName that we will display.
Let’s create the MonsterComponent in the SimpleRPG.Game and Shared folder.
@if (Monster != null)
{
<div style="border: 1px solid gainsboro; text-align: center">
    <div>@Monster.Name</div>
    <Figure>
        <FigureImage Source="@Monster.ImageName" />
        <FigureCaption><strong>Current Hit Points:</strong> @Monster.CurrentHitPoints</FigureCaption>
    </Figure>
</div>
}

@code {
    [Parameter]
    public Monster? Monster { get; set; }
}
This component is very similar to the LocationComponent we created in Lesson 2.8. We place a container <div> with a light-gray border, then display the centered monster name, image, and caption with monster’s hit points. And, we use the Blazorise <Figure> component to show an image and caption. This component is wrapped around a check of whether the Monster property is set. If there is no monster, then this component does not display anything.
In this component, we expose the Monster parameter to allow callers to specify which monster to display.
Now, we need to add the MonsterComponent to the main game screen:
@page "/"
@inject IGameSession ViewModel

<Row Margin="Margin.Is0" Style="height: 5vh; min-height: 32px">
    <Column ColumnSize="ColumnSize.Is12" Style="background-color: lightgrey">
        <Heading Size="HeadingSize.Is3">Simple RPG</Heading>
    </Column>
</Row>
<Row Margin="Margin.Is0" Style="height: 60vh">
    <Column ColumnSize="ColumnSize.Is3.OnWidescreen.Is12" Style="background-color: aquamarine">
        <PlayerComponent Player="@ViewModel.CurrentPlayer" />
    </Column>
    <Column ColumnSize="ColumnSize.Is9.OnWidescreen.Is12" Style="background-color: beige">
        <Row Margin="Margin.Is2.OnY">
            <Column ColumnSize="ColumnSize.Is8.OnWidescreen.Is12">
                Game Data
            </Column>
            <Column ColumnSize="ColumnSize.Is4.OnWidescreen.Is12">
                <LocationComponent Location="@ViewModel.CurrentLocation" />
                <MonsterComponent Monster="@ViewModel.CurrentMonster" />
            </Column>
        </Row>
    </Column>
</Row>
<Row Margin="Margin.Is0" Style="height: 33vh">
    <Column ColumnSize="ColumnSize.Is3.OnWidescreen.Is12" Padding="Padding.Is2.OnY"
            Style="background-color: burlywood">
        <PlayerTabs Player="@ViewModel.CurrentPlayer" />
    </Column>
    <Column ColumnSize="ColumnSize.Is9.OnWidescreen.Is12" Style="background-color: lavender">
        <Row Margin="Margin.Is2.OnY">
            <Column ColumnSize="ColumnSize.Is8.OnWidescreen.Is12">
                Combat Controls
            </Column>
            <Column ColumnSize="ColumnSize.Is4.OnWidescreen.Is12">
                <MovementComponent Movement="@ViewModel.Movement" LocationChanged="@ViewModel.OnLocationChanged" />
            </Column>
        </Row>
    </Column>
</Row>
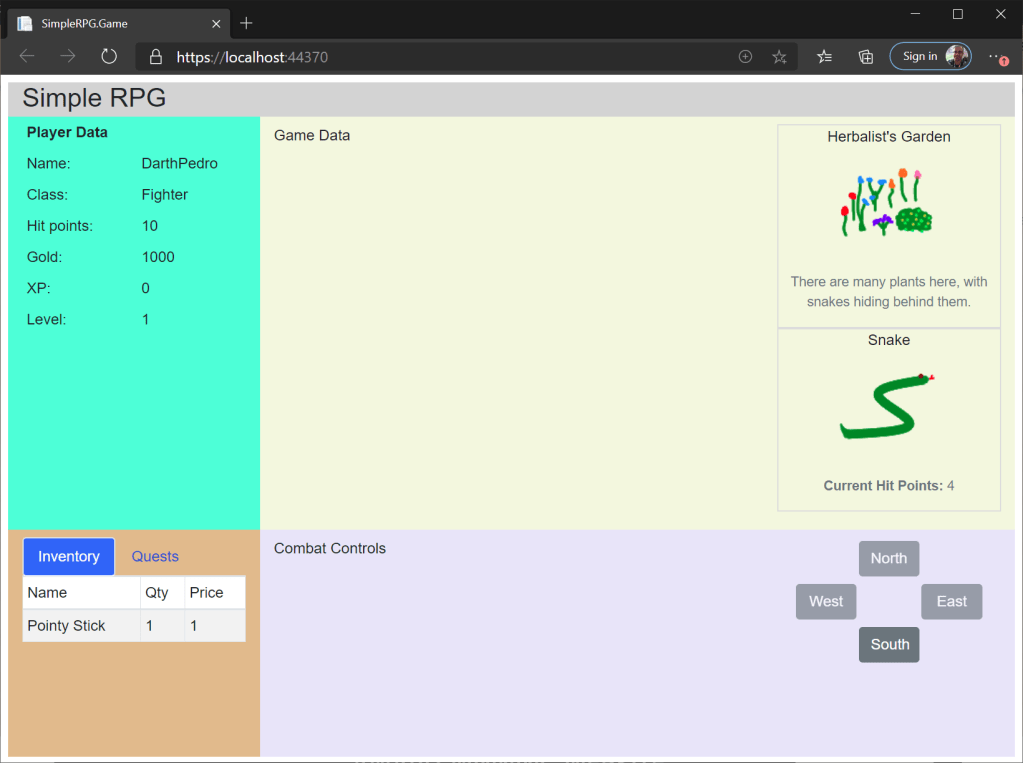
Now when we build and run the game, and move to a location with a monster (like the herbalist’s garden), we will see a snake on the screen.
With our monsters now available, we can move onto fighting these creatures and saving the village.
