
Now that we have our core design components in place (MVVM, Dependency Injection, Blazor components, and unit test coverage), we are going to focus on building out more game functionality. We will start with the game location. This lesson will add a Model class, update the view model, create a Blazor component to show the location, and then use the component on the MainScreen page.
The first 7 lessons of this chapter describe these individual steps in detail, so this chapter won’t repeat the details of creating/updating these classes. If you need a refresher on any particular step, please refer back to the appropriate lesson.
Create the Location Class
The Location model class represents the data for each location in the game. Imagine the game locations as an x-y grid (like graph paper) with a Location at each point, represented by an x and y coordinate. (0, 0) is the origin of the grid and coordinates can be positive and negative.

The graph in figure 1 is the initial layout of our locations in the game world. The origin is the Town Square. Our starting point is our Home location (0, -1).
In the SimpleRPG.Game.Engine project and Models folder, create the Location class. Then define our Location class with the following properties:
namespace SimpleRPG.Game.Engine.Models
{
    public class Location
    {
        public int XCoordinate { get; set; }

        public int YCoordinate { get; set; }

        public string Name { get; set; } = string.Empty;

        public string Description { get; set; } = string.Empty;

        public string ImageName { get; set; } = string.Empty;
    }
}
The X-YCoordinate properties represent the position in the grid. Then, there’s display name and description for a location, which are self-explanatory. Finally, there is an ImageName property which holds a relative path to an image for this location (we will describe the image retrieval later in this lesson).
Expose Current Location
Now, let’s update the GameSession view model to keep track of the player’s current location in the game world. For this initial lesson, we are just going to hard code our starting spot (Home) as the current location to show how the Location model class is used. First, add the CurrentLocation property to the IGameSession interface:
using SimpleRPG.Game.Engine.Models;

namespace SimpleRPG.Game.Engine.ViewModels
{
    public interface IGameSession
    {
        Player CurrentPlayer { get; }

        Location CurrentLocation { get; }

        void AddXP();
    }
}
Then, update the GameSession constructor implementation to create an instance of Location for the game starting point.
using SimpleRPG.Game.Engine.Models;

namespace SimpleRPG.Game.Engine.ViewModels
{
    public class GameSession : IGameSession
    {
        public Player CurrentPlayer { get; private set; }

        public Location CurrentLocation { get; private set; }

        public GameSession()
        {
            this.CurrentPlayer = new Player
            {
                Name = "DarthPedro",
                CharacterClass = "Fighter",
                HitPoints = 10,
                Gold = 1000,
                ExperiencePoints = 0,
                Level = 1
            };

            this.CurrentLocation = new Location
            {
                Name = "Home",
                XCoordinate = 0,
                YCoordinate = -1,
                Description = "This is your house.",
                ImageName = "/images/locations/home.png"
            };
        }

        public void AddXP()
        {
            this.CurrentPlayer.ExperiencePoints += 10;
        }
    }
}
We now have a location that can be accessed by other classes and projects.
Create LocationComponent
To show our current location on the game screen, we are going to create a Blazor component that given a Location shows the name, image, and description for it.
In the SimpleRPG.Game project under the Shared folder, create a new Razor component named: LocationComponent. Then implement the following code:
<div style="border: 1px solid gainsboro; text-align: center">
    <div>@Location.Name</div>
    <Figure>
        <FigureImage Source="@Location.ImageName" />
        <FigureCaption>@Location.Description</FigureCaption>
    </Figure>
</div>

@code {
    [Parameter]
    public Location Location { get; set; } = new Location();
}
Again, we expose the Location parameter to allow callers of this component to specify which location should be displayed.
We place a container <div> with a light-gray border, then display the centered location name, image, and caption. We use the Blazorise <Figure> component to show an image and caption. This component is a wrapper around the HTML figure element. This is a fairly simple component, but let’s us wrap up the behavior nicely.
Add LocationComponent to MainScreen
Now that we have our component, we will embed it in our MainScreen page (like with did in Lesson 2.6). Update the MainScreen.razor file with the following code:
@page "/"
@inject IGameSession ViewModel

<Row Style="height: 5vh; min-height: 32px">
    <Column ColumnSize="ColumnSize.Is12" Style="background-color: aliceblue">
        <Heading Size="HeadingSize.Is3">Simple RPG</Heading>
    </Column>
</Row>
<Row Style="height: 60vh">
    <Column ColumnSize="ColumnSize.Is3.OnWidescreen.Is12" Style="background-color: aquamarine">
        <PlayerComponent Player="@ViewModel.CurrentPlayer" />
        <Button Color="Color.Secondary" Outline="true" Clicked="@ViewModel.AddXP">Add XP</Button>
    </Column>
    <Column ColumnSize="ColumnSize.Is9.OnWidescreen.Is12" Style="background-color: beige">
        <Row Margin="Margin.Is2.OnY">
            <Column ColumnSize="ColumnSize.Is8.OnWidescreen.Is12">
                Game Data
            </Column>
            <Column ColumnSize="ColumnSize.Is4.OnWidescreen.Is12">
                <LocationComponent Location="@ViewModel.CurrentLocation" />
            </Column>
        </Row>
    </Column>
</Row>
<Row Style="height: 30vh">
    <Column ColumnSize="ColumnSize.Is3.OnWidescreen.Is12" Style="background-color: burlywood">
        Inventory/Quest
    </Column>
    <Column ColumnSize="ColumnSize.Is9.OnWidescreen.Is12" Style="background-color: lavender">
        Combat/Movement Controls
    </Column>
</Row>
The highlighted code adds another grid inside of the Game Data area. For now it is a single row with two columns. As you can see from the ColumnWidth definition, the right-most column takes up the a third of the available space. Notice that the columns in this sub-grid also size relative to 12 available column spaces. They breakdown the full width of the sub-grid relative to the parent area. These sizes all remain relative and responsive as the screen changes size. Learn more about the Bootstrap grid layout.
This line is responsible for rendering the LocationComponent and binding its Location property to the GameSession.CurrentLocation. This way whenever the CurrentLocation property in the view model changes, the LocationComponent is updated.
<LocationComponent Location="@ViewModel.CurrentLocation" />
Adding Location Images
To have the location images available in our game, we need to add them to the “/wwwroot/images” folder in our SimpleRPG.Game project. Create a new subfolder named locations (to differentiate them from other game images we will add later). Then add all of the images from the original SimpleRPG project, or from my code repository. Add them as source files to our project… nothing more is required, because all of the wwwroot folder’s content is copied to our output folder during the build process:
In our GameSession code above, we defined the starting location’s ImageName to match the relative path in our source code as:
ImageName = "/images/locations/home.png"
When our application/game is running, wwwroot is also the root folder for the Blazor app. So any image paths that we use are relative to that (true for all static files in our game).
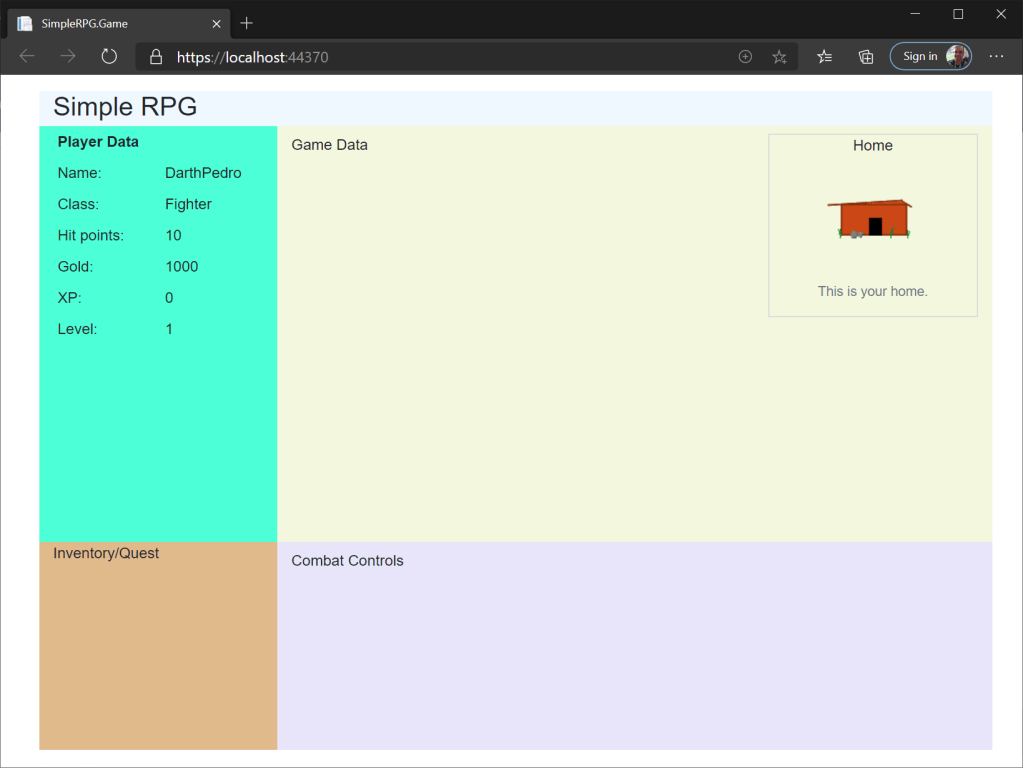
Now when we build and run our game, we should see the following screen:
Conclusion
In this lesson we coded a new feature all the way from the model class through to the UI. We made changes to all of the MVVM layers that we learned about earlier in this chapter. And as we saw, it was not difficult to make these changes:
- Add a new model class
- Expose model class through view model
- Create Blazor component to display it (using databinding)
- Embed component into a page.
Now that we are getting comfortable exercising our design, we will be able to add new features to the game quickly.
Note: although I didn’t discuss them here, I created corresponding tests for all of the code in this lesson. You can review it in the source repository test projects. Even if I don’t call it out in every lesson, each commit I make will usually have corresponding tests for the code. You can follow along with those tests to learn how to do unit and component testing.

This has been an excellent tutorial. Thank you for making this available! I think at this point my plan will be to do some personalizing of the work completed up to here (UI and player stats stuff) and spend some time reading up on some of the crunchier aspects of the content you’ve presented (mostly the testing stuff) so that I can implement the kinds of functionality I’d like while following these good habits.
LikeLike
Thanks, I’m glad you found the tutorial useful.
And definitely check back in a couple of weeks for chapter 3. I’m working on some random dice rolling and monster combat system. You should be able to incorporate it into whatever changes you make.
LikeLike