bUnit is a testing library for Blazor components. Its goal is to make it easy to write comprehensive, stable unit tests for these components. We will learn the steps to create our first bUnit test from setup to rendering to validation. This first test will be very simple to allow us to focus on the mechanics of creating the bUnit test, and not have to worry much about the test logic itself.
First, we must create a Blazor project and corresponding test project. Please follow the steps in the How-To: Add bUnit Test Project to Blazor Solution article to get both projects and all of the required packages. For this article, we called the projects: Blazor.HowTo and Blazor.HowTo.Tests.
Create New Test Class
To verify the default Index page, we are going create our test class in the Blazor.HowTo.Tests project by following these steps:
- Create a Pages folder in the test project. We want our test project structure to follow our source project to make finding corresponding classes and tests easier.
- Right-click on the Pages folder, and select the ‘Add > Class’ menu item.
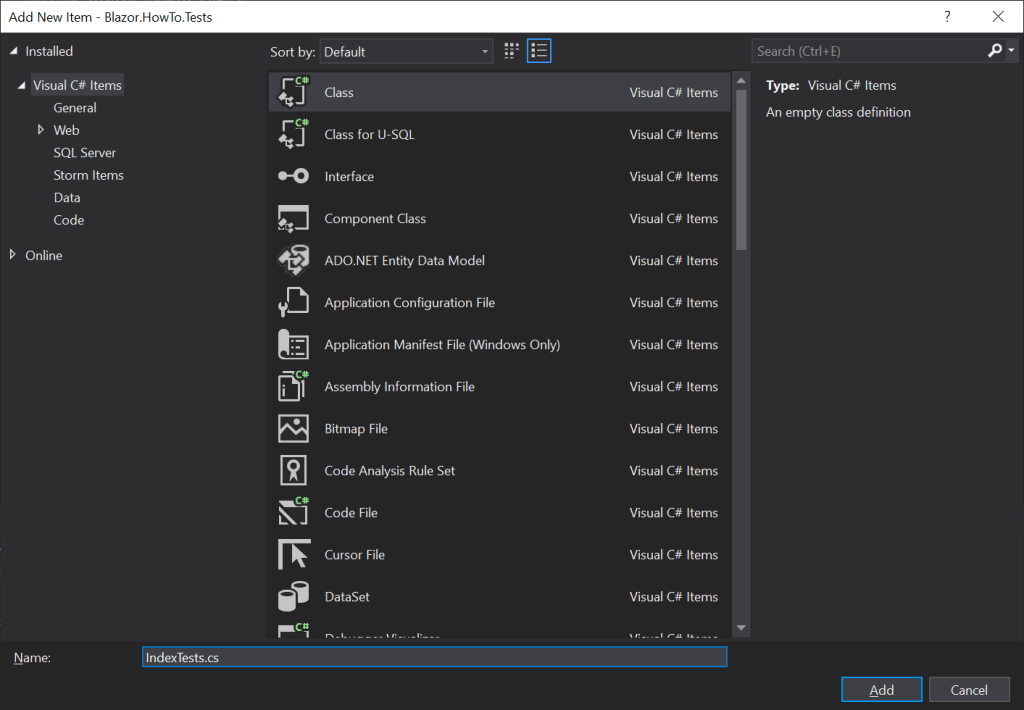
- Name the class file: IndexTests.cs. We follow the pattern of appending ‘Tests’ to the class name that is being tested. Again to make mapping test classes and implementation classes straightforward.
- Finally, click the ‘Add’ button.
This will result in the creation of a normal C# class with the specified name. The xUnit test framework just uses plain old C# objects to implement its tests.
Write First Test Method
Let’s implement the code for our first test to verify that the Index page renders the HTML we expect. Here is the code for the Index page:
@page "/"

<h1>Welcome to Blazor How-To!</h1>

<p>Welcome to your new app.</p>
Since it currently only has a welcome message in HTML and no logic, databinding, or interactivity, we only need one test to ensure we’re getting what we expect. So, here is the code for our test:
using Blazor.HowTo.Pages;
using Bunit;
using Xunit;

namespace Blazor.HowTo.Tests.Pages
{
    public class IndexTests
    {
        [Fact]
        public void InitiallRender()
        {
            // arrange
            using var ctx = new TestContext();

            // act
            var comp = ctx.RenderComponent<Index>();

            // assert
            var expectedHtml =
@"<h1>Welcome to Blazor How-To!</h1>
<p>Welcome to your new app.</p>
";
            comp.MarkupMatches(expectedHtml);
        }
    }
}
Let’s dissect this test case to learn some details about bUnit and xUnit:
- First, the test class and test method must be public to be discovered by the xUnit test runner (lines # 7 & 10).
- Second, the test method must have the
[Fact]attribute on it to be discovered by the xUnit test runner (line #9). Fact validates that one case is true. There is another test definition attribute ([Theory]), which we will use in another article. - Then, we start by creating the bUnit
TestContext(line #13). TheTestContextis a factory that makes it possible to create our components to test. It simulates the Blazor creation process for components/pages. - Next, we use the
TestContextto create ourIndexpage by calling itsRenderComponentmethod (line #16). That’s all it takes to render a simple component it bUnit.TestContextalso supports more complex scenarios (like parameters, cascading values, and injected services), which we cover in other articles. - We get back an
IRenderedComponentfor ourIndexpage. It represents the rendered component and has methods to find elements within it, get the current markup, and perform semantic matching. - Then, we setup our expected HTML for the page (lines #19-22).
- Finally. we call
IRenderedComponent.MarkupMatcheswith our expected HTML (line #23). This method validates that the HTML is what we expected using semantic matching – which means the HTML doesn’t need to be an exact string comparison match, but is equivalent to what is inIRenderedComponent. This makes validation a little more forgiving than string comparison. - If the markup does not match, the
MarkupMatchesmethod fails an assertion and our test fails. Luckily, we get a very descriptive message with which nodes failed comparison, and the actual and expected markup strings. This is great for debugging failing tests.
This gives us the basic structure of bUnit tests. As we build more complex components, the tests will also get more complex. But this basic structure will be found in all of our bUnit tests.
Run the Test
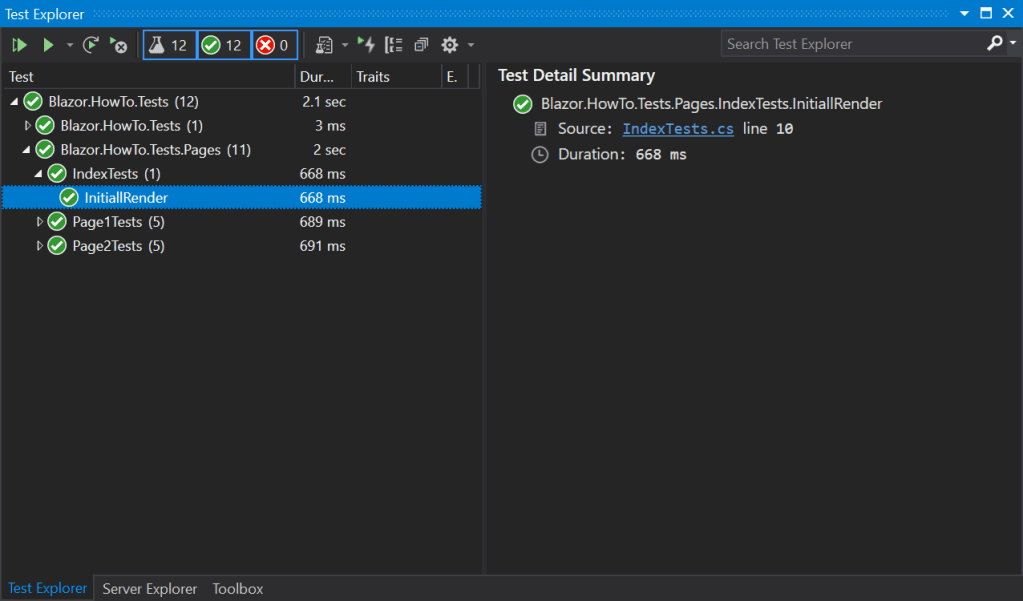
Finally, let’s build our projects and run our tests to see the outcome:
- Build the solution by selecting the ‘Build > Build Solution’ item in the main menu.
- This should produce a successful build.
- Ensure that the Test Explorer tool window is open by selecting the ‘Test > Test Explorer’ item in the main menu.
- Click the ‘Run All’ button on the Test Explorer toolbar (the far left button).
- When the test completes in the Test Explorer, drill down into the ‘IndexTests > InitialRender> nodes and see the successful green indicator.
- The Test Detail Summary shows the test passed and how long it took to run. When there are errors in tests, this area contains helpful debugging information.
That showed our test passing, but what does it look like on a failure? We will introduce a failure by changing the secondary welcome message in the <p> element. Then follow the steps above to build and run the test again.

This time we get a failure in the test list (shown by a red ‘X’). And when we look in the Test Detail Summary, we see a message telling us the HTML doesn’t match, which node is different, and the full layout of the actual and expected HTML.
In conclusion, setting up a test to use the bUnit TestContext is pretty easy. And, it provides us with the power to render a component/page in the same manner that Blazor will at runtime. It provides rich comparison helpers to assist us with validating the component state and markup. Finally, it integrates fully with the xUnit test runner and the Visual Studio Test Explorer to provide the common unit testing user experience that developers expect.
Note: Although we are using xUnit to build and run our tests for this article, bUnit can be used in different test frameworks. In the past, I have also used it with the MsTest framework too.
