Now that we have the game engine updated and the new TraderViewModel defined, we can use that to build a new screen to allow the player to buy and sell items with a trader. If you are familiar with the WPF version of this sample, this additional UI is built in a modal dialog. We will build something similar in our Blazor game.
Blazorise Modal Window
HTML and Javascript have the concept of a modal window as well. That is a window that pops up over the main page, blurs out the background, and displays its own user interface inside of a large <div> element. There is quite a lot of CSS and Javascript knowledge required to get this all working correctly, if we were to do it by hand.
Luckily, Blazorise has a <Modal> component that encapsulates all of the HTML, CSS, and Javascript code and produces exactly the behavior we want for a modal screen experience. And we’re going to use it for our TraderScreen.
First, let’s take a quick look at how to build a simple modal window with Blazorise. Let’s create a simple component that contains a button and launches the modal dialog when it is clicked.
<Button Color="Color.Primary" Clicked="OnShowModal">Show Modal from Component</Button>

<Modal @ref="@modal">
    <ModalBackdrop />
    <ModalContent Centered="true" Size="ModalSize.Large">
        <ModalHeader>
            Test Modal
        </ModalHeader>
        <ModalBody>
            <Field>
                <FieldLabel>Name</FieldLabel>
                <TextEdit />
            </Field>
        </ModalBody>
        <ModalFooter>
            <Button>Close</Button>
        </ModalFooter>
    </ModalContent>
</Modal>

@code {
    Modal modal;

    private void OnShowModal()
    {
        modal.Show();
    }
}
The first code block just defines a <Button> component and the Clicked event handler calls the Modal.Show method to show the modal UI.
Then we define the <Modal> component. The contents of the Modal component is what becomes visible when the modal UI is shown.
ModalBackdropshows the grayed out effect over the page UI… it is optional in the case you don’t want the grayed out effect.ModalHeaderis an area like a dialog header… we can place any UI in this section but it does not typically scroll.ModalBodyis a scrollable area that shows the main dialog UI. This is where we will place our trading components.ModalFooteris at the bottom of the dialog, usually used for a button bar.
The layout of this dialog is simple for initial learning purposes… It has a single title, then an edit control in the body, with a Close button. But it shows how to start using the Modal component. If we ran this code, we would see the following modal window:

Note: I built this in to a separate Blazor test app to show how it would look. It is not separately checked into the source tree.
Trader Modal Screen
Now that we have a basic understanding of modal screens in CSS and Blazorise, let’s look in detail at how we create a trader screen that lets a player buy and sell items.
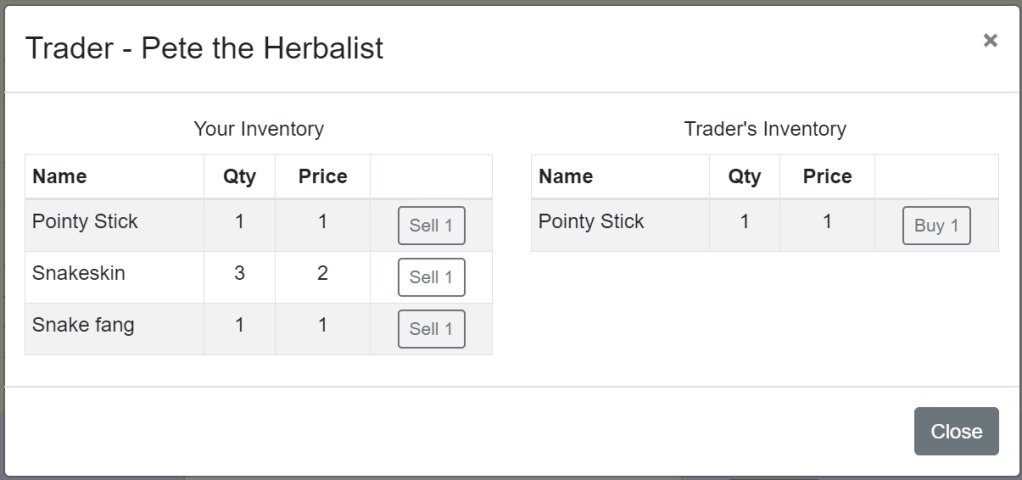
We want to build a UI that shows two tables: one for the player’s inventory, and one of the trader’s inventory. We want to provide buttons for the user to click to buy and sell these items. Here is a visual mock-up of how we would like it to look:
To create this new component, we will create the TraderComponent.razor file in the SimpleRPG.Game project and Shared folder.
@inject TraderViewModel ViewModel

@if (ViewModel.Trader != null)
{
<Row Margin="Margin.Is2.OnY">
    <Column Class="text-center">
        <Button id="show-trader-btn" Color="Color.Secondary" Margin="Margin.Is1"
                Clicked="@modal.ShowModal">
            Trader
        </Button>
    </Column>
</Row>

<Modal @ref="@modal.ModalRef" id="trader-modal">
    <ModalBackdrop id="trader-modal-backdrop" Style="z-index: 0" />
    <ModalContent Centered="true" Size="ModalSize.Large">
        <ModalHeader>
            <ModalTitle>Trader - @ViewModel.Trader.Name</ModalTitle>
            <CloseButton id="header-close-btn" Clicked="@modal.HideModal" />
        </ModalHeader>
        <ModalBody>
            <Row>
                <Column ColumnSize="ColumnSize.Is6.OnWidescreen.Is12">
                    <div class="text-center">Your Inventory</div>
                    <Table Bordered="true" Narrow="true" Striped="true" Margin="Margin.Is2.OnY">
                        <TableHeader>
                            <TableHeaderCell>Name</TableHeaderCell>
                            <TableHeaderCell Class="text-center">Qty</TableHeaderCell>
                            <TableHeaderCell Class="text-center">Price</TableHeaderCell>
                            <TableHeaderCell />
                        </TableHeader>
                        <TableBody>
                        @if (ViewModel.Player != null)
                        {
                            foreach (var item in ViewModel.Player.Inventory.GroupedItems)
                            {
                            <TableRow>
                                <TableRowCell>@item.Item.Name</TableRowCell>
                                <TableRowCell Class="text-center">@item.Quantity</TableRowCell>
                                <TableRowCell Class="text-center">@item.Item.Price</TableRowCell>
                                <TableRowCell Class="text-center">
                                    <Button id="sell-item-btn" Size="ButtonSize.Small" Color="Color.Secondary"
                                            Outline="true" Clicked="() => ViewModel.OnSellItem(item.Item)">
                                        Sell 1
                                    </Button>
                                </TableRowCell>
                            </TableRow>
                            }
                        }
                        </TableBody>
                    </Table>
                </Column>
                <Column ColumnSize="ColumnSize.Is6.OnWidescreen.Is12">
                    <div class="text-center">Trader's Inventory</div>
                    <Table Bordered="true" Narrow="true" Striped="true" Margin="Margin.Is2.OnY">
                        <TableHeader>
                            <TableHeaderCell>Name</TableHeaderCell>
                            <TableHeaderCell Class="text-center">Qty</TableHeaderCell>
                            <TableHeaderCell Class="text-center">Price</TableHeaderCell>
                            <TableHeaderCell />
                        </TableHeader>
                        <TableBody>
                        @if (ViewModel.Trader != null)
                        {
                            foreach (var item in ViewModel.Trader.Inventory.GroupedItems)
                            {
                            <TableRow>
                                <TableRowCell>@item.Item.Name</TableRowCell>
                                <TableRowCell Class="text-center">@item.Quantity</TableRowCell>
                                <TableRowCell Class="text-center">@item.Item.Price</TableRowCell>
                                <TableRowCell Class="text-center">
                                    <Button id="buy-item-btn" Size="ButtonSize.Small" Color="Color.Secondary"
                                            Outline="true" Clicked="() => ViewModel.OnBuyItem(item.Item)">
                                        Buy 1
                                    </Button>
                                </TableRowCell>
                            </TableRow>
                            }
                        }
                        </TableBody>
                    </Table>
                </Column>
            </Row>
        </ModalBody>
        <ModalFooter>
            <div style="margin: 0 auto">@ViewModel.ErrorMessage</div>
            <Button id="footer-close-btn" Color="Color.Secondary" Clicked="@modal.HideModal">Close</Button>
        </ModalFooter>
    </ModalContent>
</Modal>
}

@code {
    private SimpleRPG.Game.Helpers.ModalHelper modal = new Helpers.ModalHelper();

    [Parameter]
    public Trader? Trader { get; set; } = null;

    [Parameter]
    public Player? Player { get; set; } = null;

    [Parameter]
    public EventCallback InventoryChanged { get; set; }

    protected override void OnParametersSet()
    {
        ViewModel.Player = Player;
        ViewModel.Trader = Trader;
        ViewModel.InventoryChanged = InventoryChanged;
    }
}
Although there’s a lot of new code in this file, it should be starting to look similar to other components that we’ve built in this series (an optional button, a modal component, and @code block to provide component parameters). Now let’s look more closes at the separate blocks:
- Line #1: we inject the
TraderViewModelclass that we built in the last lesson. Remember that the@injectcommand uses the Blazor dependency injection to get an instance of that type. - Lines #3-12: check if there is a trader at the current location. If there is, it renders a Trade button and the markup for the Modal component. If there is no trader present, then this component is effectively empty.
- As we saw earlier in this lesson, line #4-90 define the full extent of the modal UI with backdrop, header, body, and footer.
- In the modal header (lines #17-20), we show the dialog title with the trader’s name, and place a close button.
- In the modal footer (lines #85-88), we have a spot to show error messages and another close button.
- In the modal body, we set up the two tables side by side. The markup between the two tables is the same. It is just that one table is bound to the player’s inventory items, and the second one is bound to the trader’s inventory items… luckily both classes have inventories (which we designed in earlier lessons by having them both derive from
LivingEntity), so this simplifies our design. - There are different buttons per item to Sell or Buy items (based on whether they belong to the player or trader). That is fairly simple logic in the markup.
- Finally, the @code block defines:
- A
ModalHelperclass that takes care of keeping modal state and opening/closing the model window. We will review the code for this class shortly. - The
Traderparameter for callers to provide the trader at the current location. - The
Playerparameter for callers to provide the current player to use in the trading screen. - The
InventoryChangedevent callback. This event gets fired whenever an item is bought or sold in the view model (we reviewed that in the last lesson). The main page updates in response to changes made in this modal dialog via this event callback. - The
OnParametersSetoverride forwards the parameters in this component to the view model, so they can be used its operations.
- A
Hopefully, that all makes sense and brings together our model changes and new TraderViewModel from the last lesson.
Tying It All Together
We have to make a few more changes in the SimpleRPG.Game project to get this new trader screen to show up and work correctly.
1. Add the TraderViewModel to the DI container in the Program.cs file.
using Blazorise;
using Blazorise.Bootstrap;
using Microsoft.AspNetCore.Components.WebAssembly.Hosting;
using Microsoft.Extensions.DependencyInjection;
using SimpleRPG.Game.Engine.Services;
using SimpleRPG.Game.Engine.ViewModels;
using System;
using System.Diagnostics.CodeAnalysis;
using System.Net.Http;
using System.Threading.Tasks;

namespace SimpleRPG.Game
{
    /// <summary>
    /// Main program class.
    /// </summary>
    [ExcludeFromCodeCoverage]
    public sealed class Program
    {
        public static async Task Main(string[] args)
        {
            var builder = WebAssemblyHostBuilder.CreateDefault(args);

            builder.Services
              .AddBlazorise(options =>
              {
                  options.ChangeTextOnKeyPress = false;
              })
              .AddBootstrapProviders();

            builder.RootComponents.Add<App>("app");
            builder.Services.AddTransient(sp => new HttpClient
            {
                BaseAddress = new Uri(builder.HostEnvironment.BaseAddress)
            });

            // add app-specific/custom services and view models here...
            ConfigureAppServices(builder.Services);

            var host = builder.Build();
            host.Services
              .UseBootstrapProviders();

            // initialize app-specific/custom services and view models here...
            InitializeAppServices(host.Services);

            await host.RunAsync().ConfigureAwait(false);
        }

        private static void ConfigureAppServices(IServiceCollection services)
        {
            // add app-specific/custom services here...
            services.AddSingleton<IDiceService>(DiceService.Instance);
            services.AddSingleton<IGameSession, GameSession>();
            services.AddTransient<TraderViewModel>();
        }

        private static void InitializeAppServices(IServiceProvider serviceProvider)
        {
            // add service initialization here...
        }
    }
}
2. Create the following helper class (ModalHelper) in the SimpleRPG.Game project and Helpers folder:
using Blazorise;

namespace SimpleRPG.Game.Helpers
{
    public class ModalHelper
    {
        public Modal? ModalRef { get; set; } = null;

        public void ShowModal() => ModalRef?.Show();

        public void HideModal() => ModalRef?.Hide();
    }
}
This is reusable code that helps deal with the Modal element reference and showing and hiding it in response to events. It deals handling with nullable modal reference objects.
3. Add the TraderComponent to the GameScreen.razor file. We add it after the MonsterComponent so that it will show up under the location image. Typically there isn’t a monster and a trader in the same location… but if there is, this will still work.
@page "/"
@inject IGameSession ViewModel

<Row Margin="Margin.Is0" Style="height: 5vh; min-height: 32px">
    <Column ColumnSize="ColumnSize.Is12" Style="background-color: lightgrey">
        <Heading Size="HeadingSize.Is3">Simple RPG</Heading>
    </Column>
</Row>
<Row Margin="Margin.Is0" Style="height: 60vh">
    <Column ColumnSize="ColumnSize.Is3.OnWidescreen.Is12" Style="background-color: aquamarine">
        <PlayerComponent Player="@ViewModel.CurrentPlayer" />
    </Column>
    <Column ColumnSize="ColumnSize.Is9.OnWidescreen.Is12" Style="background-color: beige">
        <Row Margin="Margin.Is2.OnY">
            <Column ColumnSize="ColumnSize.Is8.OnWidescreen.Is12">
                <DisplayMessageListView Messages="@ViewModel.Messages" />
            </Column>
            <Column ColumnSize="ColumnSize.Is4.OnWidescreen.Is12">
                <LocationComponent Location="@ViewModel.CurrentLocation" />
                <MonsterComponent Monster="@ViewModel.CurrentMonster" />
                <TraderComponent Trader="@ViewModel.CurrentTrader" Player="@ViewModel.CurrentPlayer"
                                 InventoryChanged="@OnInventoryChanged"/>
            </Column>
        </Row>
    </Column>
</Row>
<Row Margin="Margin.Is0" Style="height: 33vh">
    <Column ColumnSize="ColumnSize.Is3.OnWidescreen.Is12" Padding="Padding.Is2.OnY"
            Style="background-color: burlywood">
        <PlayerTabs Player="@ViewModel.CurrentPlayer" />
    </Column>
    <Column ColumnSize="ColumnSize.Is9.OnWidescreen.Is12" Style="background-color: lavender">
        <Row Margin="Margin.Is2.OnY">
            <Column ColumnSize="ColumnSize.Is8.OnWidescreen.Is12">
                <CombatComponent WeaponList="@ViewModel.CurrentPlayer.Inventory.Weapons"
                                 AttackClicked="@ViewModel.AttackCurrentMonster"
                                 LocationHasMonster="@ViewModel.HasMonster"/>
            </Column>
            <Column ColumnSize="ColumnSize.Is4.OnWidescreen.Is12">
                <MovementComponent Movement="@ViewModel.Movement"
                                   LocationChanged="@ViewModel.OnLocationChanged" />
            </Column>
        </Row>
    </Column>
</Row>

@code {
    [System.Diagnostics.CodeAnalysis.ExcludeFromCodeCoverage]
    private void OnInventoryChanged()
    {
        StateHasChanged();
    }
}
With all of these changes made, we can rebuild and run the game again. Let’s go kill a few snakes to get some items, and then go to the herbalist to see the Trader button on the game screen:

Then, click the Trader button to launch the trading modal screen:

You can now buy and sell as many items as you have.
There we have it… We completed adding the trader feature to the game engine and UI. No roleplaying game is complete without some great items/weapons to buy and sell.
